| 10th Heavy Anti-Aircraft Regiment, RA | |
|---|---|
 Cap Badge of the Royal Artillery | |
| Active | December 1939– 1 June 1943 |
| Country |
|
| Branch |
|
| Role | Anti-aircraft artillery |
| Part of |
Gibraltar Command Malta Command |
| Engagements |
Defence of Gibraltar Siege of Malta |
10th Heavy Anti-Aircraft Regiment, Royal Artillery was an air defence unit of the British Army that served in the Mediterranean Theatre during World War II. Having been formed in Gibraltar early in the war, it moved to Malta where it defended the island during the Siege of 1940–43.
Defence of Gibraltar[]
Before the war there had been only one anti-aircraft (AA) battery of the Royal Artillery (RA) stationed in Gibraltar: 19 AA Bty, under the command of 3rd Heavy Regiment, RA. This was joined by 9 AA Bty from Hong Kong in the summer of 1939, so that on the outbreak of war in September 1939 there were two batteries of gunners manning the totally inadequate AA defences of the fortress. These consisted of four old 3-inch guns and four new 3.7-inch guns, spread in two-gun sections to give the widest possible coverage, and two of the new Bofors 40 mm guns, which protected the Royal Navy Dockyard, with the assistance of Royal Navy (RN) 2-pounder pom-pom guns.[1][2][3][4]


The Royal Artillery-trained Gibraltar Defence Force man a 3.7-inch gun during World War II.
A regimental headquarters (RHQ) was formed (as 10th Anti-Aircraft Regiment) in December 1939 to take over 9 and 19 AA Batteries. They were also engaged in training the AA Section of the new Gibraltar Defence Force, which initially manned two of the 3-inch guns. Apart from occasional shots fired at unidentified aircraft penetrating Gibraltar's airspace, there were no attacks on the fortress during the 'Phoney war' period.[3][5][6][7]
After the Fall of France, a group of AA detachments under 53rd (City of London) AA Rgt escaped from Marseilles aboard the SS Alma Dawson. A French dockyard strike prevented them from loading any of their 3-inch guns or vehicles, but they mounted Bofors guns on the ship's deck and put to sea on 18 June. On arrival in Gibraltar they reinforced 10th AA Rgt. On 27 June, 82nd (Essex) AA Regiment arrived from England on the SS City of Cairo, and once they had unloaded their guns and equipment (16 x 3.7-inch, 8 x Bofors and GL Mk I gun-laying radar), 53rd AA Rgt re-embarked for home.[3][8][9]
These reinforcements led to reorganisation of the AA units in Gibraltar: 19 AA Bty joined 82nd AA Rgt, while 9 AA Bty took over all the Bofors guns. A searchlight (S/L) battery arrived, and an AA Operations Room (AAOR) was established to control all the gunsites and to coordinate with AA-equipped ships in the harbour.[3] From June 1940, those AA units equipped with 3-inch or 3.7-inch guns were termed Heavy Anti-Aircraft (HAA) to distinguish them from the new Light Anti-Aircraft (LAA) units being formed.
The first serious air raid on Gibraltar came at 02.00 on 18 July, when two unidentified aircraft bombed the slopes of the Rock, causing some fatalities. The attack was thought to be by the Vichy French Air Force in retaliation for the British attack on the French fleet at Mers-el-Kebir on 3 July (Operation Catapult), which had been carried out by Force H from Gibraltar.[3][10][11][12] On 21 August the AA defences brought down a Savoia-Marchetti SM.79 bomber during a raid by the Italian Regia Aeronautica. On 24 and 25 September Vichy bombers attacked Gibraltar again in retaliation for the British and Free French attack on Dakar (Operation Menace), and caused considerable damage. Several of these bombers were shot down by the combined AA fire.[3]
In July 1940, 10th HAA Rgt HQ had been ordered to be transferred to Malta, but this did not occur until November when, as part of Operation Coat, a reinforcement convoy for Malta put in at Gibraltar. This included two independent HAA batteries: 191 (formerly of 69th (Warwickshire) HAA Rgt) and 222 (formerly of 68th (North Midland) HAA Rgt), together with spare AA guns and barrels. The convoy picked up RHQ of 10th HAA Rgt and sailed on from Gibraltar on 7 November. The troops disembarked in Malta on 10 November where they joined the garrison and 10th HAA Rgt took over command of 199 and 222 HAA Btys. It was later joined by 190 HAA Bty (also from 69th (Warwickshire) HAA Rgt) which reached Malta in January.[3][5][6][13][14][15][16][17][18][19] A new 13th HAA Rgt was later formed in Gibraltar to replace the absent 10th.[3][5][20]
Siege of Malta[]


HMS Illustrious (right of crane) under attack.
Malta had been under air attack since the day Italy entered the war (11 June 1940) and urgently needed AA reinforcements. In January 1941, the German Luftwaffe joined the Regia Aeronautica in attacks on Malta.[21] On 11 January the damaged aircraft carrier HMS Illustrious came into Grand Harbour for repairs. The Luftwaffe laid on a major air raid (possibly 50 Junkers Ju 88 and 20 Junkers Ju 87 Stuka 's) on 16 January to finish off the carrier, but the AA guns on the island had been re-sited to defend the ship alongside Parlotorio Wharf with a box barrage, and the raiders suffered heavily. A second raid made two days later was also disrupted by the defences. Only one bomb hit the ship, but the adjacent towns were badly hit, and nearby ships and AA positions suffered casualties. On 19 January the Luftwaffe tried again, with a diversionary raid on Luqa airfield, but Illustrious made her way to Alexandria under her own steam on 23 January.[18][22][23][24][25]
In February the Luftwaffe 's Fliegerkorps X was ordered to neutralise Malta, and it began a series of heavy bombing raids, mainly at night, accompanied by mine-dropping in and around the harbour, and daylight sweeps by Messerschmitt Bf 109 single-engined fighters. In March there was dive-bombing against the RAF airfields, and attacks on a supply convoy on 23 March. The HAA guns were engaged almost every day, taking a steady toll of the bombers. By the beginning of June the depleted Fliegerkorps X handed responsibility back to the Italians.[18][26][27]

From April 1941, the regiment, together with 7th HAA Rgt and the Royal Malta Artillery HAA units, came under 7 AA Brigade covering the south half of the island, while 10 AA Brigade took the north. This arrangement was found not to work, and soon 7 AA Bde took over all the LAA and S/L defences while 10 AA Bde commanded the HAA guns, including 10th HAA Rgt, which defended the RAF airfields. New guns and GL Mk. I radar also arrived on the island.[17][28][29][30][31][32][33][34]
Malta was largely left alone during the summer of 1941, but attacks resumed in November 1941 after Fliegerkorps II arrived in Sicily. Air raids were increasingly common during November and December, and rations and supplies began to run short.[35][36][37] At the turn of the year 10 HAA Bde instituted a policy of rotating its units to maintain freshness. 10th HAA Regiment exchanged with 7th HAA Rgt and took responsibility for defending Fort Manoel and Grand Harbour. At this point it manned 4 x 4.5-inch, 16 x 3.7-inch and 4 x 3-inch guns.[31][37][38][39][40]

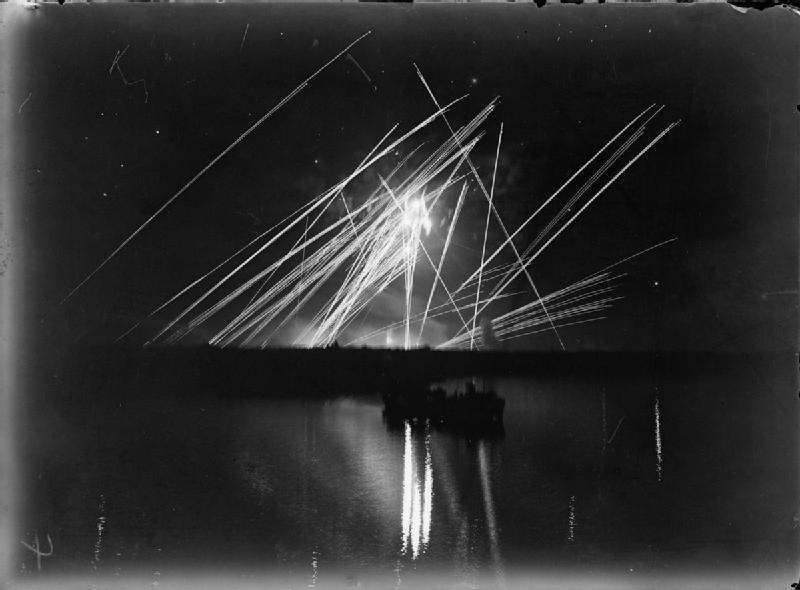
Tracer fire and shellbursts over Grand Harbour during a night air raid.
The Luftwaffe continued to pound the island, concentrating on the harbour and airfields, usually with raids of 15 Ju 88s escorted by 50 or more fighters. By now the RAF fighter strength had been reduced to a handful of aircraft, and the AA guns were the main defence. March and April 1942 were the period of the heaviest air raids on Malta, with well over 250 sorties a day on occasions. In April 1942 the Luftwaffe switched tactics to Flak suppression, with particular attention being paid to the HAA gunsites.[41][42] On the last day of April the Regia Aeronautica rejoined the attack – which the AA gunners took as a sign that the Luftwaffe was suffering badly. By now each HAA regiment on Malta was rationed to 300 rounds per day and replacement gun barrels were scarce. When the fast minelayer HMS Welshman ran in ammunition supplies on 10 May (part of Operation Bowery), the most intense AA barrage yet fired was provided to protect her while unloading. After that, Axis air raids tailed off during the summer, apart from a flare-up in July.[33][43][44]
By October the Luftwaffe had reinforced Fliegerkorps II, and a new round of heavy raids began, using new low-level tactics. However, these attacks also lost heavily to the AA guns and RAF fighters, despite the increasing shortages of food and supplies on the island. At last, in November Welshman and her sister ship HMS Manxman appeared, followed by a supply convoy. With the Axis defeat at Alamein and the Allied North Africa landings the same month, the siege of Malta was ended. The only enemy air activity for the rest of the year was occasional high-flying reconnaissances and one raid on Luqa in December.[45][46]


Malta – the Harbour Barrage from the Upper Barracca, by Leslie Cole; depicting an AA gun (in the centre of the composition) firing during a night air raid.
By June/July 1943 the regiment was manning 15 x 3.7-inch and 6 x 4.5-inch guns and formed part of a large AA concentration protecting the build-up of forces in Malta for the Allied invasion of Sicily (Operation Husky):[31][47][48]
- 190 HAA Bty
- XHE25 (Fleur-de-Lys or 'Flurry') – 3 x static 4.5-inch Mk I, GL Mk II radar
- XHE26 (Tal-Qroqq) -– 4 x static 3.7-inch Mk II
- 191 HAA Bty
- XHD17M (Ta Ġiorni, St Julian's) – 3 x static 3.7-inch Mk II
- XHE28 (Spinola Battery) – 3 x static 4.5-inch Mk I, GL Mk I radar
- 222 HAA Bty:
- XHE27 (Naxxar) – 4 x static 3.7-inch Mk II
- XHE33 (Tal-Balal) – 4 x mobile 3.7-inch Mk IA, GL Mk II radar
Disbandment[]
The Regimental HQ of 68th (North Midland) HAA Rgt had been captured at the fall of Tobruk on 21 June 1942.[49][50] The remaining batteries were caught up in the rearguard actions during the Eighth Army's subsequent retreat and the remnants of the regiment were officially reduced to a cadre in September.[5][14][51][52][53]
After the Tobruk disaster, 222 HAA Bty stationed on Malta as part of 10th HAA Rgt was deemed 'to carry on the honour title, traditions and plate' of 68th HAA Rgt.[14] On 1 June 1943, RHQ 10th HAA Rgt was officially disbanded and reformed as RHQ 68th (North Midland) HAA Regiment, with the same batteries: 222 from Derby, 190 and 191 from Birmingham.[5][6][14][17][52][54][55]
Although the AA defences of Malta were progressively run down as units returned home or joined the campaigns in Sicily and later in mainland Italy,[56][57] 68th HAA Rgt remained part of the permanent garrison of the island until the end of the war and beyond.[17][31] The regiment was placed in suspended animation in Malta in December 1946 so that it could be officially reformed in the Territorial Army in the UK on 1 January 1947. The personnel remaining in Malta then became 36 HAA Rgt in the postwar Regular RA.[14][17][58]
Notes[]
- ↑ Routledge, Table XI, p. 68; Table XIII, p. 69.
- ↑ Monthly Army List, May 1939.
- ↑ 3.0 3.1 3.2 3.3 3.4 3.5 3.6 3.7 Routledge, pp. 201–4.
- ↑ 3 Hvy Rgt at RA 39–45.
- ↑ 5.0 5.1 5.2 5.3 5.4 Farndale, Annex M.
- ↑ 6.0 6.1 6.2 "10 HAA Rgt at RA 39–45.". http://www.ra39-45.pwp.blueyonder.co.uk/haa/page10.html.
- ↑ Rankin, p. 153.
- ↑ 53 HAA Regt War Diary 1940–41, The National Archives (TNA), Kew, file WO 166/2343.
- ↑ "82 HAA Rgt at RA 39–45.". http://www.ra39-45.pwp.blueyonder.co.uk/haa/page45.html.
- ↑ Playfair, Vol I, pp. 130–37, 142.
- ↑ Rankin, pp. 1–7.
- ↑ Smith, pp. 57–88.
- ↑ Anon, pp. 4–5.
- ↑ 14.0 14.1 14.2 14.3 14.4 Litchfield, p. 39.
- ↑ Playfair, Vol I, pp. 119, 219, 241.
- ↑ Rollo, pp. 205, 280.
- ↑ 17.0 17.1 17.2 17.3 17.4 Rollo, Annex A.
- ↑ 18.0 18.1 18.2 Routledge, p. 167.
- ↑ 69 HAA Rgt War Diary 1939–41, TNA file WO 166/2360.
- ↑ "13 HAA Rgt at RA 39–45.". http://www.ra39-45.pwp.blueyonder.co.uk/haa/page13.html.
- ↑ Playfair, Vol II, p. 44.
- ↑ Anon, pp. 6–7.
- ↑ Farndale, p. 169.
- ↑ Playfair, Vol I, pp. 319–23.
- ↑ Playfair, Vol II, p. 46.
- ↑ Anon, pp. 7–9.
- ↑ Playfair, Vol II, pp. 47–51.
- ↑ Anon, p. 8.
- ↑ Farndale, Years of Defeat, Annex F.
- ↑ Rollo, Annex C.
- ↑ 31.0 31.1 31.2 31.3 Rollo, Annex E.
- ↑ "HQRA Malta at RA 39–45.". http://www.ra39-45.pwp.blueyonder.co.uk/malta/page2.html.
- ↑ 33.0 33.1 Playfair, Vol III, p. 179.
- ↑ Routledge, p. 168.
- ↑ Anon, pp. 9–11.
- ↑ Playfair, Vol III, pp. 108, 118, 174.
- ↑ 37.0 37.1 Routledge, p. 169.
- ↑ Anon, pp. 10–11.
- ↑ Routledge, Table XXVII, p. 174; Map 7.
- ↑ "Malta 1942 AA deployment map, at RA 39–45.". http://www.ra39-45.pwp.blueyonder.co.uk/malta/page3.html.
- ↑ Anon, pp. 12–6.
- ↑ Playfair, Vol III, pp. 158, 162, 170–1, 178–9.
- ↑ Anon, pp. 22–5.
- ↑ Playfair, Vol III, pp. 187–8, 193–4, 314.
- ↑ Anon, pp. 26–7.
- ↑ Playfair & Molony, Vol IV, pp. 194–200.
- ↑ Rollo, pp. 282–5.
- ↑ Routledge, Table XXIX, p. 175.
- ↑ List of units captured in Tobruk 21 June 1942, TNA file WO 201/690.
- ↑ Playfair, Vol III, pp. 273–4.
- ↑ Playfair, Vol III, pp. 288–97.
- ↑ 52.0 52.1 "68 HAA Rgt at RA 39–45.". http://www.ra39-45.pwp.blueyonder.co.uk/haa/page31.html.
- ↑ Routledge, pp. 137–40.
- ↑ Rollo, p. 280.
- ↑ Joslen, pp. 464, 485.
- ↑ Anon, pp. 30–1.
- ↑ Rollo, p. 287.
- ↑ 36 HAA Rgt at British Army 1945 on.
References[]
- Anon, A short history of 7th Heavy A.A. Regiment, 3rd September, 1939-5th March, 1944, in the defence of Malta, Aldershot : Gale & Polden, 1947.* Gen Sir Martin Farndale, History of the Royal Regiment of Artillery: The Years of Defeat: Europe and North Africa, 1939–1941, Woolwich: Royal Artillery Institution, 1988/London: Brasseys, 1996, ISBN 1-85753-080-2.
- Maj-Gen I.S.O. Playfair, "History of the Second World War, United Kingdom Military Series: The Mediterranean and Middle East, Vol I: The Early Successes against Italy (to May 1941), London: HMSO, 1954/Uckfield, Naval & Military Press, 2004 ISBN 1-845740-65-3.
- Maj-Gen I.S.O. Playfair, "History of the Second World War, United Kingdom Military Series: The Mediterranean and Middle East, Vol II: The Germans come to the aid of their Ally (1941), London: HMSO, 1956/Uckfield, Naval & Military Press, 2004 ISBN 1-845740-66-1.
- Maj-Gen I.S.O. Playfair, History of the Second World War, United Kingdom Military Series: The Mediterranean and Middle East, Vol III: (September 1941 to September 1942) British Fortunes reach their Lowest Ebb, London: HMSO, 1960 /Uckfield, Naval & Military Press, 2004, ISBN 1-845740-67-X.
- Maj-Gen I.S.O. Playfair & Brig C.J.C. Molony, "History of the Second World War, United Kingdom Military Series: The Mediterranean and Middle East, Vol IV: The Destruction of the Axis forces in Africa, London: HMSO, 1966/Uckfield, Naval & Military Press, 2004, ISBN 1-845740-68-8.
- Denis Rollo, The Guns and Gunners of Malta, Valetta: Mondial, 1999, ISBN 99909-68-84-5.
- Nicholas Rankin, Defending the Rock: How Gibraltar Defeated Hitler, London: Faber & Faber, 2017, ISBN, 978-0-571-30770-8.
- Brig N.W. Routledge, History of the Royal Regiment of Artillery: Anti-Aircraft Artillery 1914–55, London: Royal Artillery Institution/Brassey's, 1994, ISBN 1-85753-099-3
- Colin Smith, England's Last War Against France: Fighting Vichy 1940–1942, London: Weidenfeld & Nicolson, 2009, ISBN 978-0-297-85218-6.
External sources[]
The original article can be found at 10th Heavy Anti-Aircraft Regiment, Royal Artillery and the edit history here.