| 2/48th Battalion | |
|---|---|
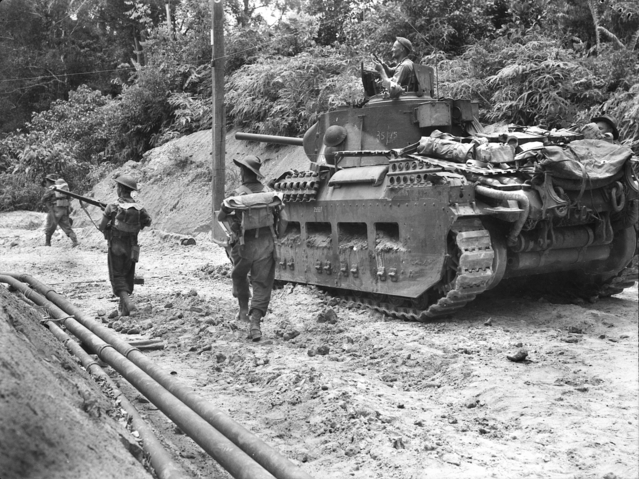 Troops from 'C' Company, 2/48th Battalion advance alongside Matilda tanks from the 2/9th Armoured Regiment during the attack on the "Sykes" feature on Tarakan in April 1945 | |
| Active | 1940–1945 |
| Country |
|
| Branch | Australian Army |
| Type | Infantry |
| Size | ~800–900 all ranks[Note 1] |
| Part of | 26th Brigade, 9th Division |
| Colours | White and Light Blue |
| Engagements | |
| Commanders | |
| Notable commanders | Victor Windeyer |
| Insignia | |
| Unit Colour Patch |
 |
The 2/48th Battalion was an infantry battalion of the Australian Army which served during the Second World War. Raised in Adelaide in South Australia in August 1940, the battalion formed part of the 26th Brigade and was initially assigned to the 7th Division, although it was later transferred to the 9th Division in 1941 when it was deployed to the Middle East. While there, it saw action during the siege of Tobruk and the Second Battle of El Alamein before being returned to Australia in order to take part in the fighting in New Guinea following Japan's entry into the war. During the campaign in New Guinea, the battalion took part in the advance on Lae and the fighting around Finschhafen and Sattelberg. Following this it was withdrawn to Australia, where the it remained for over a year. In mid-1945 the 2/48th Battalion took part in the landings on Tarakan, which was its final involvement in the war. It was disbanded in October 1945 and is considered to be Australia's most highly decorated unit of the war, with four members receiving the Victoria Cross, the nation's highest decoration for gallantry, while over 80 other decorations were also made to its members.[1]
History[]
Formation[]
The 2/48th Battalion was raised in August 1940 at the Wayville Showgrounds in Adelaide, under the command of Lieutenant Colonel Victor Windeyer, a former Militia officer who had previously commanded the Sydney University Regiment.[2] A unit of the Second Australian Imperial Force, the 2/48th Battalion was formed specifically for service overseas and recruited mainly from the state of South Australia.[3] Forming part of the 26th Brigade along with the 2/23rd and 2/24th Battalions, it was assigned to the 7th Division during its initial training period but was later transferred with the rest of the 26th Brigade to the 9th Division. After undertaking training at Woodside, the battalion embarked for North Africa in November 1940, moving to Cyrenica in the Middle East with the 9th Division, where it completed further training in preparation for being sent into battle.[1]
North African Campaign[]
Tobruk[]
The battalion saw its first action of the North African Campaign during the defence of Tobruk where it received one of it first battle honours. The 2/48th first entered Tobruk's defences on 9 April 1941 with the rest of the 9th Division commanded by Lieutenant General Leslie Morshead. Instructed to hold the fortress for eight weeks by General Archibald Wavell, Commander-in-Chief of British Middle East Command, the 9th Division ended up defending the fortress for over eight months before being gradually withdrawn. During this time the battalion was responsible for capturing virtually the entire 1st Battalion of the Italian 62nd Regiment, Trento Division, including nearly 800 officers and men.[1][4] Overall, the 2/48th suffered 160 casualties at Tobruk, including 38 men killed and another 18 who died of their wounds.[5]
El Alamein[]
After Tobruk, the 9th Division was sent to Palestine and Syria in order to train and rest. Under their new commander, Lieutenant-Colonel Heathcote Hammer—who had assumed command after Windeyer took over the 20th Brigade—the 2/48th proceeded to train in high terrain and temperatures.[6] The 26th Brigade was moved south before being hurriedly committed to the First Battle of El Alamein in early July 1942. On 1 July, Axis forces commanded by Erwin Rommel launched an attack on the British Eighth Army line and on 7 July the 9th Division was ordered into the attack, as part of which the 2/48th was subsequently ordered to traverse the coastline and capture the Trig 33 ridge north of the "Tel el Eise" station.[1]


Members of the 2/48th Battalion manning a defensive position around Tobruk in 1941
The 2/48th commenced their attack shortly before dawn on 10 July. After an initial artillery bombardment that disrupted the Italian troops, the main objective of the attack (Trig 33) was captured and 400 Italians were taken prisoner. They then advanced south and captured Tel el Eisa station, before successfully defended it against a number of Axis counter-attacks.[7] On 22 July the battalion was ordered to capture West Point 24 on the Tel El Eisa ridge which was held by heavily entrenched Axis forces. However after initial success, the 2/48th came under heavy artillery and mortar fire and was forced to withdraw, having suffered over 100 casualties.[8] For actions during this attack, Private Arthur Stanley Gurney was awarded the battalion's first Victoria Cross (VC) after he captured a machine-gun post and bayoneted the gun crew that was firing on his company, and then went on to capture a second post before being killed while taking a third. In total, the 2/48th suffered 215 casualties in the period 7 July to 23 October 1942, with 64 men killed, six dying of their wounds and 125 wounded.[5]
In August, Lieutenant-General Bernard Montgomery took over command of the British Eighth Army and he succeeded in preventing the Axis advance during the Battle of Alam el Halfa. Montgomery then began preparing for an allied offensive against the Axis forces that were now entrenching themselves. The Second Battle of El Alamein started on 23 October and finished on 7 November with Axis forces fleeing. During this offensive the 2/48th was awarded two Victoria Crosses. The battalion's second VC, was awarded to Sergeant William Henry Kibby for actions across a one-week period. Kibby had charged several Axis positions and subsequently killed attacking an enemy position with grenades on 31 October.[9]
Private Percival Gratwick earned the battalion's third VC on 25 October in the same area as Gratwick. His platoon had been reduced to seven men by enemy fire so Gratwick charged the nearest enemy position of his own volition. He killed the occupants, destroyed the post with grenades and was proceeding to neutralise another position when he too was killed.[9] Overall, the 2/48th suffered a further 344 casualties in the period 23 October to 5 November 1942 with 85 men killed, 13 dying of their wounds and 243 wounded.[10]
After helping to secure victory at El Alamein the 9th Division left Alamein on 3 December and moved to Gaza in Palestine. Since the previous October, the Australian government had sought to bring the division back to Australia in order to use it against the Japanese in the Pacific and on 15 December the British prime minister, Winston Churchill, had finally agreed to provide the necessary shipping to make this a reality.[11] Following a divisional parade at Gaza, the 2/48th Battalion embarked upon the troopship Nieuw Amsterdam on 24 January 1943; they arrived in Fremantle in mid-February.[1][12]
South-West Pacific[]
Re-organisation[]
After arriving in Australia a period of leave followed, after which welcome home parades were held in every capital city.[13] In April 1943, the battalion was re-organised and re-trained for jungle operations in the South-West Pacific theatre in order to prepare them for the conditions they would encounter in New Guinea.[14] Undertaking training on the Atherton Tablelands in Queensland, the battalion was converted to the tropical establishment. Warfare in the Pacific posed unique problems and differed greatly to that which the 2/48th had experienced in North Africa. In the jungles of New Guinea logistics and transport were significant challenges and in order to meet them, the battalion's size was reduced by over 100 men as its anti-aircraft and Bren carrier platoons were disbanded, while each of the battalion's four rifle companies lost most of their organic motor transport; the mobility issue would be solved by marching on foot as vehicles were relatively useless in dense jungle, while supplies would be brought up using native carriers as well as by air.[15][16] In July 1943, the battalion moved to Cairns where they undertook amphibious training with the American 532nd Engineer Boat and Shore Regiment around Trinity Beach as part of their final preparations before being committed to the fighting in New Guinea.[17]
New Guinea[]
After arriving in New Guinea, the 2/48th undertook further amphibious training around Milne Bay, before taking part in the landing around Lae on 4 September 1943. This was the first large-scale amphibious landing conducted by the Australian forces since the landings at Gallipoli in 1915, and the battalion, along with the rest of the 26th Brigade, landed on Red Beach, about 10 miles (16 km) north-west of Lae.[18] Following the fall of Lae to the 7th Division on 16 September, the 2/48th Battalion remained there until the 26th Brigade was moved to Finschhafen on the Huon Peninsula in order to support the 20th Brigade, which had landed earlier in the month but come under heavy Japanese counterattack.[19] During this time the battalion took part in repelling an attempted Japanese landing at Scarlet Beach.[1]
After the Japanese counteroffensive was defeated in late October 1943, Australian attention turned to Sattleberg, with the 26th Brigade chosen to lead the assault as it was fresher than the division's other brigades.[20] The main advance began on 17 November, although the battalion took part in a preliminary attack on Green Ridge the previous day in order to secure the start line for the advance.[21] Pushing north-west from Jivevenang in company with Matilda tanks from the 1st Tank Battalion, the 2/48th began the drive towards Sattleberg.[22] In difficult terrain and against stubborn Japanese defence,[23] the advance made slow progress, nevertheless by 22 November Steeple Tree Hill was captured and the battalion reached the southern slopes of the Sattelberg feature, about 600 yards (550 m) from its summit.[24]


Tom Derrick raising the Australian flag over Sattelberg mission
On 24 November, the 2/48th's 'C' Company carried out a surprise attack on the position from the south-east. Crossing Siki Creek, the company stepped off shortly before 17.30 hours and reached the base of a steep cliff, from where they began their assault on the summit.[25] Held up by machine gun fire and grenades that were lobbed from the Japanese position above, and finding it almost impossible to move up the hill which had a gradient of between 45 and 60 degrees, the attack appeared in danger of failure as light began to fade and ammunition ran low. However the actions of one of the company's platoon commanders, Sergeant Tom Derrick, reinvigorated the attack. Laying his sections down to provide covering fire, he went forward alone armed with a rifle and a quantity of grenades, attacking the Japanese positions as he went. In the end he accounted for 10 such posts, before the attack was halted 100 yards (91 m) from the summit.[25]
During the night, the company clung to the edge of the plateau upon which the Sattelberg mission was situated, as fresh supplies were brought up from the rear. The attack was resumed at 0835 hours the next day, supported by heavy artillery and mortar fire, however, as the 2/48th crested the ridge they found the position unoccupied, with the Japanese having abandoned it the previous night.[26] For his actions the previous day, Derrick was given the honour of raising the Australian flag over the mission and was later awarded a Victoria Cross—the battalion's fourth—to go with the Distinguished Conduct Medal he had received for actions during the fighting around Alamein.[27] Later Derrick was sent to an Officer Training Unit, after which he was commissioned and returned to the battalion as a lieutenant.[28]
Following the capture of Sattelberg, the 2/48th continued the advance north along with the rest of the 26th Brigade, pushing on over difficult terrain to Wareo, where they arrived on 8 December.[29] Following this, the Japanese began to fall back to Sio in retreat and the battalion's involvement in combat operations came to an end. In February 1944, they were withdrawn back to Australia along with the 9th Division.[1] During their time in New Guinea, the battalion had suffered 125 casualties, of which 36 were killed, three died of wounds, eight died of illness and 77 were wounded.[10]
Tarakan[]
After a period of leave, the battalion began reforming near Ravenshoe, Queensland, on the Atherton Tablelands in April 1944.[1] During this time the composition of the units of the 9th Division underwent significant changes as many men were discharged due to medical reasons or transferred to other units and young replacements were brought in.[30] Finally, following more than a year training in Australia the battalion was committed to its final deployment of the war, moving to Morotai Island in April 1945 in order to take part in the landing on Tarakan as part of Operation Oboe.[1][31]


.jpg)
A 3 inch mortar team from 2/48th Battalion during the fighting on Tarakan
The entire 26th Brigade group was assigned the task of capturing Tarakan Island and destroying the Japanese garrison and the assault began on 1 May 1945.[31] Embarking on HMAT Manoora, the 2/48th was in the van of the attack, leading the brigade in at 0715 hours, landing on Red Beach, on the left flank of the lodgement, 2 miles (3.2 km) from Tarakan town on the western side of the island.[32][33] The preliminary bombardment had been successful, however, and as the battalion came ashore they were unopposed and barely even got their feet wet.[1][34] Pushing inland, the 2/48th had secured its primary objectives by 0838 hours. The right forward company took sporadic fire as it secured the oil tanks, while on the left they were able to capture the bridge over the Sibengkok and the high feature overlooking the landing beach without meeting any resistance.[34]
Advancing inland, the Japanese pillboxes that had fired on the right forward company were secured after they were abandoned by the defenders. A company was then sent along the Anzac Highway to secure Collins Highway ridge. By 1340 hours the western end of the ridge had been secured, however, the battalion began taking fire from the east.[34] Forward momentum was maintained, although the 2/48th suffered a number of casualties, and by the end of the day a 2,000 yards (1,800 m) by 2,800 yards (2,600 m) beachhead had been established, and the battalion had companies on Collins Highway ridge, one on the "Parks" feature and another at "Finch".[35][Note 2]
Over the course of the next couple of days, Japanese resistance to the Australian advance increased. Throughout May and into June as the Australians pressed towards the island's airfield, significant engagements took place in the mountain ranges surrounding Tarakan town.[1] On 2 May the 2/48th captured Lyons Ridge, before pressing on towards Tarakan Hill, where they assaulted the "Sykes" feature supported by Matilda tanks from the 2/9th Armoured Regiment. Here they experienced their heaviest losses of the campaign, losing six killed and 26 wounded during the three assaults up the steep slopes of the feature.[36] Their next major engagement came in late May when the 2/48th was engaged in fighting around Freda Ridge as part of the drive on Fukukaku.[37] A company level attack was put in and after stiff resistance the ridge was captured. The following morning, as the battalion waited for a Japanese counterattack, Tom Derrick, who had played a key role in capturing the position the previous day, was mortally wounded. He subsequently died of his wounds on 24 May 1945.[38]
Shortly afterwards, in early June, major combat operations on the island ceased and the Australians began the mopping up phase of the campaign, however, this was not made official until the third week in June.[39] These operations continued into July[40] and during this time, the 2/48th was assigned a sector near the Pamusian River on the eastern coast, as well as Tarakan town and the centre of the island.[1] During their involvement in the Borneo campaign, the battalion had suffered 173 casualties.[41]
Disbandment[]
Following the end of hostilities in August, the battalion remained on the island to undertake garrison duties. As the demobilisation process began, its numbers dwindled as long-serving men were repatriated back to Australia, while others with only limited service were transferred to other units for further service. Finally, on 25 October 1945, while still on Tarakan, the battalion was disbanded.[1]
Commanding officers[]
- Lieutenant Colonel William John Victor Windeyer (9 August 1940 – 6 January 1942);
- Lieutenant Colonel Heathcote Howard Hammer (8 January 1942 – 18 June 1943);
- Lieutenant Colonel Robert Ainslie (22 July 1943 – 12 August 1945).[1][42]
Battle honours[]
The 2/48th Battalion was awarded the 14 battle honours for its service during the war:
- North Africa 1941–42, Defence of Tobruk, El Adem Road, The Salient 1941, Defence of Alamein Line, Tell el Eisa, El Alamein, South-West Pacific 1943–45, Lae–Nadzab, Finschhafen, Defence of Scarlet Beach, Sattelberg, Borneo, Tarakan.[1][43]
Decorations[]
The 2/48th Battalion was "Australia's highest decorated unit of the Second World War".[1] Four members of the battalion received the Victoria Cross, three of them posthumously. Other decorations awarded to members of the 2/48th included: four Distinguished Service Orders, 12 Military Crosses, 10 Distinguished Conduct Medals, 24 Military Medals and 36 Mentioned in Despatches.[44][Note 3]
Notes[]
- Footnotes
- ↑ The establishment of a standard infantry battalion was 35 officers and 875 other ranks. Under the jungle organisation each battalion was reduced by one officer and 106 other ranks. See Coates 1999 and Palazzo 2004.
- ↑ During the planning stage, the Australian staff had named a number of hills and features in order to make passing orders and planning simpler. Long 1963, p. 408.
- ↑ These figures vary slightly from those of the AWM, which are: four VCs, four DSOs, 11 MCs, 10 DCMs, 23 MMs and 39 MIDs.
- Citations
- ↑ 1.00 1.01 1.02 1.03 1.04 1.05 1.06 1.07 1.08 1.09 1.10 1.11 1.12 1.13 1.14 1.15 "2/48th Battalion". Australian War Memorial. http://www.awm.gov.au/units/unit_11288.asp. Retrieved 26 July 2009.
- ↑ "NX396 Major General William John Victor Windeyer, KBE, CB, DSO & Bar". Australian War Memorial. http://www.awm.gov.au/units/people_1080621.asp. Retrieved 10 January 2010.
- ↑ Johnston 2002, p. xii.
- ↑ Coulthard-Clark 1998, p. 183.
- ↑ 5.0 5.1 Johnston 2002, p. 248.
- ↑ Johnston 2002, p. 68.
- ↑ Johnston 2002, p. 77.
- ↑ Johnston 2002, p. 87.
- ↑ 9.0 9.1 Arthur 2005, pp. 248–249.
- ↑ 10.0 10.1 Johnston 2002, p. 249.
- ↑ Johnston 2002, p. 135.
- ↑ Johnston 2002, pp. 138–140.
- ↑ Johnston 2002, p. 141.
- ↑ Johnston 2002, p. 143.
- ↑ Coates 1999, p. 49.
- ↑ Palazzo 2001, p. 184.
- ↑ Johnston 2002, p. 146.
- ↑ Johnston 2002, pp. 147–148.
- ↑ Johnston 2002, pp. 159–160.
- ↑ Johnston 2002, pp. 162–163.
- ↑ Johnston 2002, pp. 167–168.
- ↑ Keogh 1965, p. 329.
- ↑ Keogh 1965, p. 330.
- ↑ Johnston 2002, p. 179.
- ↑ 25.0 25.1 Johnston 2002, p. 180.
- ↑ Keogh 1965, p. 332.
- ↑ Johnston 2002, pp. 180–181.
- ↑ Johnston 2002, p. 191.
- ↑ Keogh 1965, pp. 332–334.
- ↑ Johnston 2002, p. 186.
- ↑ 31.0 31.1 Long 1963, p. 406.
- ↑ Keogh 1965, p. 441.
- ↑ Long 1963, p. 414.
- ↑ 34.0 34.1 34.2 Long 1963, p. 415.
- ↑ Johnston 2002, p. 201.
- ↑ Johnston 2002, pp. 209–210.
- ↑ Johnston 2002, p. 216.
- ↑ Stanley 1997, p. 147.
- ↑ Johnston 2002, p. 218.
- ↑ Keogh 1965, p. 443.
- ↑ Long 1963, p. 451.
- ↑ Johnston 2002, p. xvi.
- ↑ Maitland 1999, pp. 139–145.
- ↑ Johnston 2002, p. 253.
References[]
- Arthur, Max (2005). Symbol of Courage: Men Behind the Medal. Pan Books. ISBN 978-0-330-49133-4.
- Coates, John (1999). Bravery Above Blunder: The 9th Australian Division at Finschhafen, Sattelberg, and Sio. South Melbourne: Oxford University Press. ISBN 0-19-550837-8.
- Coulthard-Clark, Chris (1998). The Encyclopaedia of Australia's Battles. Sydney: Allen & Unwin. ISBN 1-86448-611-2.
- Johnston, Mark (2002). That Magnificent 9th: An illustrated history of the 9th Australian Division 1940–46. Crows Nest: Allen & Unwin. ISBN 1-86508-654-1.
- Keogh, Eustace (1965). The South West Pacific 1941–45. Melbourne: Grayflower Productions. OCLC 7185705.
- Long, Gavin (1963). The Final Campaigns. Australia in the War of 1939–1945, Series 1—Army. Volume VII (1st ed.). Canberra: Australian War Memorial. OCLC 1297619. http://www.awm.gov.au/histories/second_world_war/volume.asp?levelID=67909.
- Maitland, Gordon (1999). The Second World War and its Australian Army Battle Honours. East Roseville, New South Wales: Kangaroo Press. ISBN 0-86417-975-8.
- Palazzo, Albert (2001). The Australian Army: A History of its Organisation 1901–2001. South Melbourne: Oxford University Press. ISBN 0-19-551507-2.
- Palazzo, Albert (2004). "Organising for Jungle Warfare". In Dennis, Peter; Grey, Jeffrey. The Foundations of Victory: The Pacific War 1943–1944. Canberra: Army History Unit. ISBN 978-0-646-43590-9. http://www.army.gov.au/Our-history/Army-History-Unit/Chief-of-Army-History-Conference/Previous-Conference-Proceedings/~/media/Files/Our%20history/AAHU/Conference%20Papers%20and%20Images/2003/2003-The_Pacific_War_1943-1944_Part_1.ashx.
- Stanley, Peter (1997). Tarakan: An Australian Tragedy. Sydney, New South Wales, Australia: Allen & Unwin. ISBN 1-86448-278-8.
Further reading[]
- Glenn, John (1960). Tobruk to Tarakan: The Story of the 2/48th Battalion, A.I.F. Adelaide: Rigby. OCLC 220180650.
External links[]
The original article can be found at 2/48th Battalion (Australia) and the edit history here.