| Battle of Bir Hakeim | |||||||
|---|---|---|---|---|---|---|---|
| Part of the Battle of Gazala | |||||||
 Free French Foreign Legionnaires assaulting an enemy strong point at Bir Hakeim | |||||||
| |||||||
| Belligerents | |||||||
|
|
| ||||||
| Commanders and leaders | |||||||
|
|
| ||||||
| Strength | |||||||
| 3,703 men[1] | Unknown[nb 1] | ||||||
| Casualties and losses | |||||||
| ~900 captured[4][5] | Unknown | ||||||
Bir Hakeim (Arabic pronunciation: [bɪr ħaˈkiːm]; sometimes written Bir Hacheim) is a remote oasis in the Libyan desert, and the former site of a Turkish fort. During the Battle of Gazala, the 1st Free French Division of Général de brigade Marie Pierre Kœnig defended the site from 26 May-11 June 1942 against much larger attacking German and Italian forces directed by Generaloberst Erwin Rommel. The battle was later greatly used for propaganda purposes by all involved parties. Tobruk was taken 10 days later by Rommel's troops.[2][6] Rommel continued to advance against delaying actions by the British until halted at First Battle of El Alamein in July.
Général Bernard Saint-Hillier said in an October 1991 interview: "A grain of sand had curbed the Axis advance, which reached Al-Alamein only after the arrival of the rested British divisions: this grain of sand was Bir Hakeim."[7]
The Battle of Bir Hakeim[]
Libyan context in summer 1942[]
At the beginning of 1942, after its defeat in the west of Cyrenaica, the British 8th Army faced the Axis troops in Libya roughly 30 miles (48 km) west of the port of Tobruk along a line running from the coast at Gazala south south-east some 30 miles (48 km) ending at Bir Hakeim. Both sides were busily regrouping and General Claude Auchinleck, the Commander in Chief of British Middle East Command, had been advised to fight a major battle in May to forestall Axis plans of attack. However, 8th Army was not ready to make an offensive and so Lieutenant-General Neil Ritchie, the army commander, anticipated fighting a battle on his prepared position, meeting an Axis attack and destroying his enemy's armoured forces in the process.[8] Ritchie's defences in the northern half of the front comprised well dug in mutually supporting Brigade Group positions protected with wire and minefields. To the south of this, in order to extend the front and force any potential enemy flanking force to travel a long distance and also hamper its resupply, the defences consisted of two Brigade group defensive "boxes" linked by thickly sown minefields and wire. The first box, held by British 150th Infantry Brigade was roughly 6 miles (9.7 km) from the next position north (held by 69th Infantry Brigade) while the gap to the southernmost box at Bir Hakeim (1st Free French Brigade) was 13 miles (21 km) further south. While the defences of these boxes were well prepared and constructed, they were too far apart to provide mutual support should one of them face a concentrated attack.[8]
Auchinleck's appreciation of the situation to Ritchie in mid-May anticipated two possible Axis strategies: a concentrated attack in the centre of the front and then a thrust at Tobruk or an enveloping of the southern flank looping round towards Tobruk. Auchinleck saw the former as more likely (with a feint on the flank to draw away 8th Army's armour) while Ritchie favoured the latter. Auchinleck suggested that 8th Army's armour should be concentrated near El Adem and so be well placed to meet either threat.[9]
At the meeting of Axis leaders at Berchtesgaden on 1 May it was agreed that Rommel should attack at the end of May with the object of capturing Tobruk. He was not to move further east than the border with Egypt and was then to remain on the defensive while the Axis concentrated on the capture of Malta (Operation Herkules). Once his supply lines were secured by the fall of Malta, Rommel would invade Egypt.[10]
To prepare his attack, Rommel relied on multiple intelligence sources: German Military Intelligence (Abwehr) had managed to crack British military codes, and could decipher the communications sent to U.S. military attachés describing their military situation. They had also infiltrated Cairo with a spy, Johannes Eppler (Operation Salaam), and could use the Horch Radio surveillance company's services. Rommel had only 90,000 men and 575 Panzers compared to the British forces of 100,000 men and 994 tanks, but he had the initiative and his troops were more experienced, and had proven themselves more competent at desert warfare. On top of this, Rommel's tanks and cannon were stronger than their British counterparts, and their tactical use of layered anti-tank gun screens, with 5 cm Pak 38 guns in front of the famous 88 mm gun anti-aircraft gun used in an anti-tank role, out-ranged most British tank guns (also note that the British 2 pounder tank gun had no high explosive shell to effectively engage soft targets such as anti-tank guns). Rommel's plan was to go south, around the British front, and then to head north to split General Neil Ritchie's 8th Army in two. On 26 May, Rommel launched his attack, hoping to reach the Suez Canal.


Italian tanks Semovente 75/18 in the North African Campaign, 1942.
With his left flank composed of the Italian X and XXI Corps (Sabratha, Trento, Brescia and Pavia divisions), and of the German 150th Infantry Brigade (150. Infantriebrigade), Rommel launched a frontal attack on Gazala, situated on the coast to give the impression that his main attack would be in the north.[10] At the same time, he sent to the south his five best divisions (the 15th and 21st Panzer, 90th Light Infantry, Italian 132nd Ariete Armoured, and the Italian 101st Trieste Motorized), flanking the north-south 8th Army line and to gain access to the rear of his enemy and cut their supply lines.


Rommel's attack: frontal attack on Gazala and bypass towards Bir Hakeim, while the British Army retreats to cover Tobruk.
The fort at Bir Hakeim[]
The fortress at Bir Hakeim, which previously was set up by the Turkish and later used as a station by the Italian camel corps, the meharist, is located on the crossroad of former Bedouin paths. The wells at the place had long been dried out and it was abandoned until British Indian troops occupied it to build a strong point against the advancing axis troops. The British troops were relieved by the 1st Free French Division, commanded by Général Marie Pierre Kœnig.[1] This was quite a diverse unit, created from several distinct groups fleeing the military occupation of France. It had about 3,600 men and at least one woman, split into six battalions:
- Two Foreign Legion battalions, the 2nd and 3rd battalions of the 13th Foreign Legion Demi-Brigade, already well experienced at guerilla warfare, under the command of Colonel Dimitri Amilakvari.
- Two colonial battalions from and French colonies in Pacific, forming the marching demi-brigade of Colonel Roux.
- A battalion of Fusiliers Marins, under the command of Commander Hubert Amyot d'Inville with 12x Bofors, reinforced by D Troop, 43rd Battery, 11th (COLY) RAA, 84 gunners manning six Bofors guns.
- The Troupes de Marine (Marine Infantry) battalion of Commander Jacques Savey.
There were also small units, such as the 22nd North African Company of Captain Lequesne and the 17th Sappers Company of Captain Desmaisons. They had artillery support from the 1st artillery regiment of Colonel Laurent-Champrosay.[11]
Their equipment was also diverse in origin. There were 63 Bren Carriers, several trucks and two howitzers from the British, but most of the artillery pieces were French and came from the Levant: 54 75mm guns (30 were used in an anti-tank role), 14 47 mm APX anti-tank gun, 18 25 mm Hotchkiss anti-tank gun and 86 British-supplied Boys anti-tank rifles and eighteen Bofors 40 mm gun anti-aircraft guns. Most of the infantry equipment was French, with 44 81 mm (3.19 in) or 90 mm (3.54 in) mortars, 76 Hotchkiss machine guns, 96 anti-aircraft and 270 infantry FM 24/29 light machine guns. The fort had food supplies for 10 days and 20,000 75 mm shells.[11]
Preparing for the battle, Kœnig had the luxury of three months time, which he used for digging trenches, setting up machine gun nests as well as spreading a vast amount of land mines around the fortress.[1] The vast majority of the defenses were at or below ground level thus presenting few direct-fire targets.
The Italian assault[]
On the night of 26 May 1942, Rommel started his attack, taking the initiative. The 15th and 21st Panzer Divisions, the rest of the 90th Motorized Infantry Division, and the Italian Trieste and Ariete Divisions started the large encircling move south of Bir-Hakeim as planned. The British armoured units—taken by surprise—reacted in an improvised and unorganized manner at the attack and took heavy casualties. Learning about the enemy moves, Kœnig awoke his men and ordered them to take their battle positions.


Italian M13/40 tank
On 27 May, Rommel gave the order to General De Stefanis - commanding the Ariete Armoured Division - to attack Bir Hakeim from the southeast. This division - formed of the 132nd Armoured Regiment, equipped with M13/40s, of the 8th Reggimento bersaglieri and of the 132nd Artillery Regiment - attacked the French position at 09:30 from the rear in two successive waves. The bersaglieri had tried to get out of their trucks to support the armored advance, but a heavy barrage from the French artillery forced them to retreat. The armored vehicles, charging courageously without infantry support, tried to cross the minefield and six tanks managed to infiltrate the French lines, avoiding mines and anti-tank fire. They were eventually destroyed by very close range 75 mm fire, and the crews were captured. Captain Morel, leading the 5th company, thought the situation was desperate and set fire to the company flag and confidential documents.
The Ariete Division, reduced to only 33 tanks in 45 minutes, had to retreat. The remaining tanks then tried to outflank this resistance by attacking the north, but made contact with the V zone minefield protecting that face. They eventually regrouped and retreated, leaving behind 32 destroyed tanks and 91 prisoners, including Lieutenant Colonel Pasquale Prestisimone, commander of the 132nd Italian Armoured Regiment. Only two French soldiers were wounded and a truck and a cannon were destroyed. Most of the antitank artillery fire took place only 400 or 200 meters away from the French lines, but the legionnaires did not step back. The 27 was a defeat for the Axis in the south, but north of Bir Hakeim, the 3rd Indian Motor Brigade had been annihilated, and two weakened British brigades - the 4th and the motorized 7th Armoured - were forced to retreat to Bir-el-Gubi and to El-Adem, leaving Bir-Hakeim completely isolated.
On 28–29 May, the Royal Air Force bombed Bir Hakeim and its surroundings, misled by the Italian tank wrecks in and out of the position. Kœnig was therefore forced to send a detachment under Capitaine de Lamaze's orders to destroy the wrecks to avoid any more mistakes. The group sent a column to make contact with the 150th British brigade, stationed further to the north. After a few hours Italian artillery forced them to give up, but the retreating French column managed to destroy seven enemy half-tracks. On 29 May, the detachment of Capitaine Gabriel de Sairigné destroyed three German panzers.
On 30 May, Bir Hakeim was quite calm; only one enemy infiltration occurred in the minefields.
When 620 thirsty and exhausted Indian soldiers, captured by the Axis and then released in the middle of the desert during their attack, eventually reached the safety of the fort, adding to the 243 prisoners already there, a water shortage threatened. The detachment of Capitaine Lamaze - on the demand of the 7th British Armoured Division - sealed off the breach opened the day before by the Axis tanks in the minefields. Led by Colonel Dimitri Amilakhvari, the legionnaires were ambushed by the enemy, but managed to retreat with the help of the Bren Carriers of the 9th company Messmer.
On 31 May, the 50 resupplying trucks of the 101st motorized company of Captaine Dulau eventually reached Bir Hakeim with its water cargo. On its return, the convoy took the Indians, the prisoners, and the heavily wounded back to Allied lines. A raid by the detachments Messmer, de Roux and de Sairigné—led by Colonel Amilakhvari—destroyed five tanks and an armored vehicle repair workshop. The Germans had been forced to retreat temporarily to the west because of a counter-attack by 150th British brigade, but during night this same brigade was destroyed allowing Rommel access to his supply lines north of Bir Hakeim, and the next morning the encirclement of the fort was resumed.
The siege[]

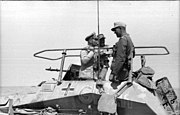
Erwin Rommel and Fritz Bayerlein near Bir Hakeim
Rommel's success in the north was very costly, especially in tanks where he was outnumbered to begin with. Even with the destruction on 1 June of the British 150th Brigade, Rommel's wide flanking plan was proving riskier because of the resistance at Bir Hakeim (his right flank and supply route was threatened by this position). The Afrika Korps had to take Bir Hakeim. The Italian divisions received troop reinforcements from the Afrika Korps and the fort had been bombed several times on the first of June. Then, on 2 June, Rommel sent the Trieste division, the 90th Light Infantry Division, and 3 recon armored regiments from the Pavia division against Bir Hakeim.
The garrison spotted the enemy advance at 8am, German troops coming from the south, while Italian forces were coming from the north. Two Italian officers presented themselves at 10:30am at the 2nd Foreign Legion battalion lines, asking for the capitulation of the fort. General Koenig rejected the offer. From the 2 June 10a.m., an artillery dual took place, while the fort was being massively bombed by German and Italian air forces. The German Stukas alone flew more than twenty bombing raids on Bir Hakeim. The British Army was unable to support the French forces, except on 2 June, when they repulsed the attack of the Ariete division. Koenig's isolation was almost total, although the RAF continued to attack the German and Italian concentrations around the fort, and the scores of burning vehicles helped to maintain the morale of Bir Hacheim's defenders. On 4 June Koenig signalled Air Vice-Marshal Arthur Coningham: "Bravo! Merci pour la R.A.F." which brought the reply "Merci pour le sport".[12]
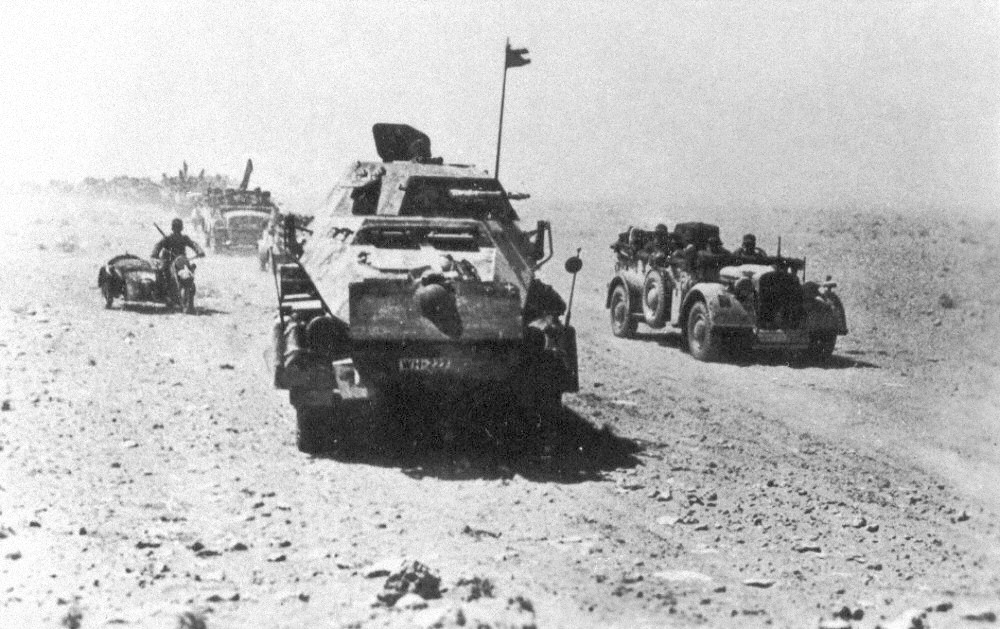

The advance of the 21st panzer division
From 6 June, the fighting became even more intense. At about 11am, the 90th Light Division, commanded by Brigadier-General (Generalmajor) Ulrich Kleemann - holder of the Knight's Cross - sent its assault detachments, with the support of pioneers, to try to clear a passage through the minefield. The German pioneers managed to approach to within 800 metres (870 yd) of the fort, after having breached the outer minefield; during the night they managed to clear several passages into the inner perimeter. German infantry were able to gain a foothold, but the French defenders, taking cover in fox holes, dug outs, and blockhouses, kept up heavy fire on the exposed attackers. Although some parts of the minefields had been cleared, the precision and density of fire prevented any significant advance by the German troops. Even with food and water shortages, the well-entrenched legionnaires were still resisting. On 7 June, four RAF raids were made against the advancing troops engaged in the minefields.
That night a last convoy approached the fort, and Aspirant Bellec broke through the German lines to meet it. With the help of a heavy fog, the unseen convoy then managed to resupply the fort. On the other side, exploiting the same weather conditions, Rommel prepared for the final assault: heavy tanks, 88 mm guns and Colonel Hacker's pioneers were formed up in front of the fort. On the morning of 8 June Rommel was ready for the last battle.
He personally commanded the attack on the north,[2] approaching as close as he could, with artillery firing directly against the fortifications. The Luftwaffe was in constant support, with, amongst others, a raid of 42 Stukas. General Koenig addressed his men, telling them 10 June would be the last day to hold on, and that they could retreat on 11 June, since the British had had enough time to reorganize their troops.
The brigade had just enough ammunition and food for another day, but not enough water. Before 9am the fog prevented any combat, and gave enough time for the radio team of Captain Renard to contact the British, whose planes dropped 170 liters, most of which was given to the wounded. Rommel had asked for the reinforcement of the 15th Panzerdivision, and no real ground combat actions were attempted before its arrival, around 12, apart from the German artillery and air forces still bombarding the fort. A few skirmishes occurred between the 66th Italian Infantry regiment of the Division Trieste and the men of Lieutenant Bourgoin, now fighting only with hand grenades. At 1 pm, 130 aircraft bombed the fort's north face while the German infantry launched its attack, supported by the 15th Panzerdivision, with heavy barrages from the artillery. A breach was made in Captain Messmer's 9th company lines, and into the central position of Aspirant Morvan, but the situation was saved with the help of the Bren Carriers. The Axis artillery continued bombarding until 9 pm, and at that time a new attack was launched, again without success. After this last assault, the French officers planned to abandon the position, which was untenable and strategically unimportant.
Evacuation[]


Free French Forces evacuating Bir Hakeim
On 9 June, the evacuation order reached the French camp. That night, General Koenig set up its plan. He asked for RAF protection and planned the evacuation at 11 pm on the 10, since he had to wait for a watering and extraction point to be set by the British troops southwest of the position. So they will have to resist for another full day before evacuating, with only 200 75 mm and 700 mortar rounds left for the day.
On the morning of 10 June, the heavy bombings started over, and assault was launched against the Oubangui-Chari and 3rd Foreign Legion battalion lines, preceded by a raid of 100 Stukas on the fort. The tanks of the 15th Panzerdivision nearly overpowered the sector, but a last counter-attack by Messmer's and Lamaze's men, supported by Bren Carriers and the last mortar rounds, eventually repulsed them. After this, another two hour long German attack will fail, and the Axis forces decided to delay the attack to the next morning, not knowing that the defenders had run out of ammunition.
Then, the complex evacuation began. The heavy equipment was destroyed, and the 2nd Foreign battalion prepared to break through the lines to rendez-vous with the British 7th Motorized Brigade, 7 kilometers southwest of the fort. Mine clearance by the sappers took longer than they had planned for, and, 75 minutes late, Capitaine Wagner's 6th company first left the perimeter. Out of time, the sappers had not been able to clear the 200 meters wide corridor they should have, and only a narrow passage was cleared to the southwest. Then, an illumination flare spotted the French evacuation, and French officers, understanding that Germans would soon appear issued a decisive order: they decided to rush massively to the southwest, even if the cleared path was not wide enough. Many vehicles got blown away, but the 3rd Foreign battalion, and the Pacific overseas battalion had managed to leave the sector. More than a real planned evacuation, it had become a massive rush to southwest of the French. Little detachments neutralized, on the way out of the blockade, the three successive Axis defensive lines. Captain Lamaze's Bren Carriers excelled in this task, but the Captain was killed with Captain Bricogne, while running from a machine gun nest to another, using grenades to destroy them. Lieutenant Dewey was also killed by a 20 mm round. Others, like the captain commanding the 3rd battalion, were captured, but most of the brigade managed to break through the encirclement, following Amilakvari's section, and reached Gasr-el-Arid. The British spotted the first element of the French column, led by Bellec, at 4 in the morning. At 8 am, most of the brigade had reached the extraction point, but during the day, British patrols would rescue numerous lost men.
Consequences of the battle of Bir Hakeim[]
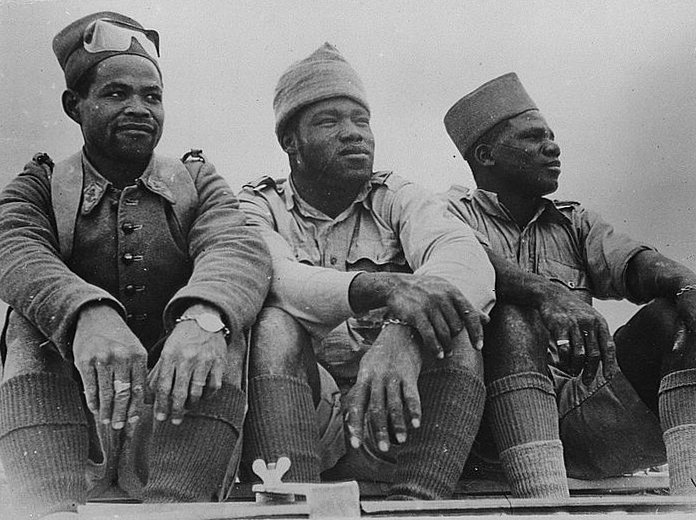

Three African soldiers of the French Colonial Artillery who distinguished themselves in the battle at Bir Hackeim. They are from Senegal, Equatorial Africa, and Madagascar, respectively
For the Free French, a victory was badly needed to show the Allies that the army of the Free France was not, as often suggested, a bunch of desperados, but a serious force that could contribute in the battle against the Reich. The Free French used the battle to show the world that France was not the decadent nation it appeared to be after its catastrophic defeat in 1940. De Gaulle used it to delegitimize cooperation with the Vichy regime. To withstand the overpowering Rommel army was an enormous achievement by Koenig and his men. British General Ian Playfair said: "The lengthened defense of the French garrison played a major role in the re-establishment of the British troops in Egypt. The free French gravely disrupted, from the beginning, Rommel's offensive, resulting on a disturbed supply line of the Afrika Korps. The growing Axis troop concentration in the sector, needed to subjugate the fort, saved the British 8th Army from a disaster. The delays in the offensive caused by the relentless French resistance increased the British chances of success and eased the preparation of the counter-offensive. On long term, holding back Rommel allowed the British forces to escape from its meticulously planned annihilation. That's why we can say, without exaggerating, that Bir Hakeim greatly contributed to El-Alamein defensive success".[citation needed] General Claude Auchinleck said on June 12, 1942, about Bir Hakim: "The United Nations need to be filled with admiration and gratitude, in respect of these French troops and their brave General Koenig".[13],. Winston Churchill was more terse: “Holding back for fifteen days Rommel's offensive, the free French of Bir Hakeim had contributed to save Egypt and the Suez Canal's destinies”.[citation needed]
Even Adolf Hitler respond to the journalist Lutz Koch, coming back from Bir Hakim: "You hear, Gentlemen? It is a new evidence that I have always been right! The French are, after us, the best soldiers! Even with its current birthrate, France will always be able to mobilize a hundred divisions! After this war, we will have to find allies able to contain a country which is able of military exploits that astonish the world like they are doing right now in Bir-Hakeim!".[14]
On 6 June, Rommel had already received orders from Hitler to kill all enemy soldiers in battle or shoot them when captured. In Hitler's view the Free French troops were a group of partisans, rather than regular soldiers, that also hosted political refugees from Germany. Rommel supposedly burnt this order: regardless, he never followed it and took Free French soldiers as regular POWs.[citation needed]
Notable individuals present at the battle[]
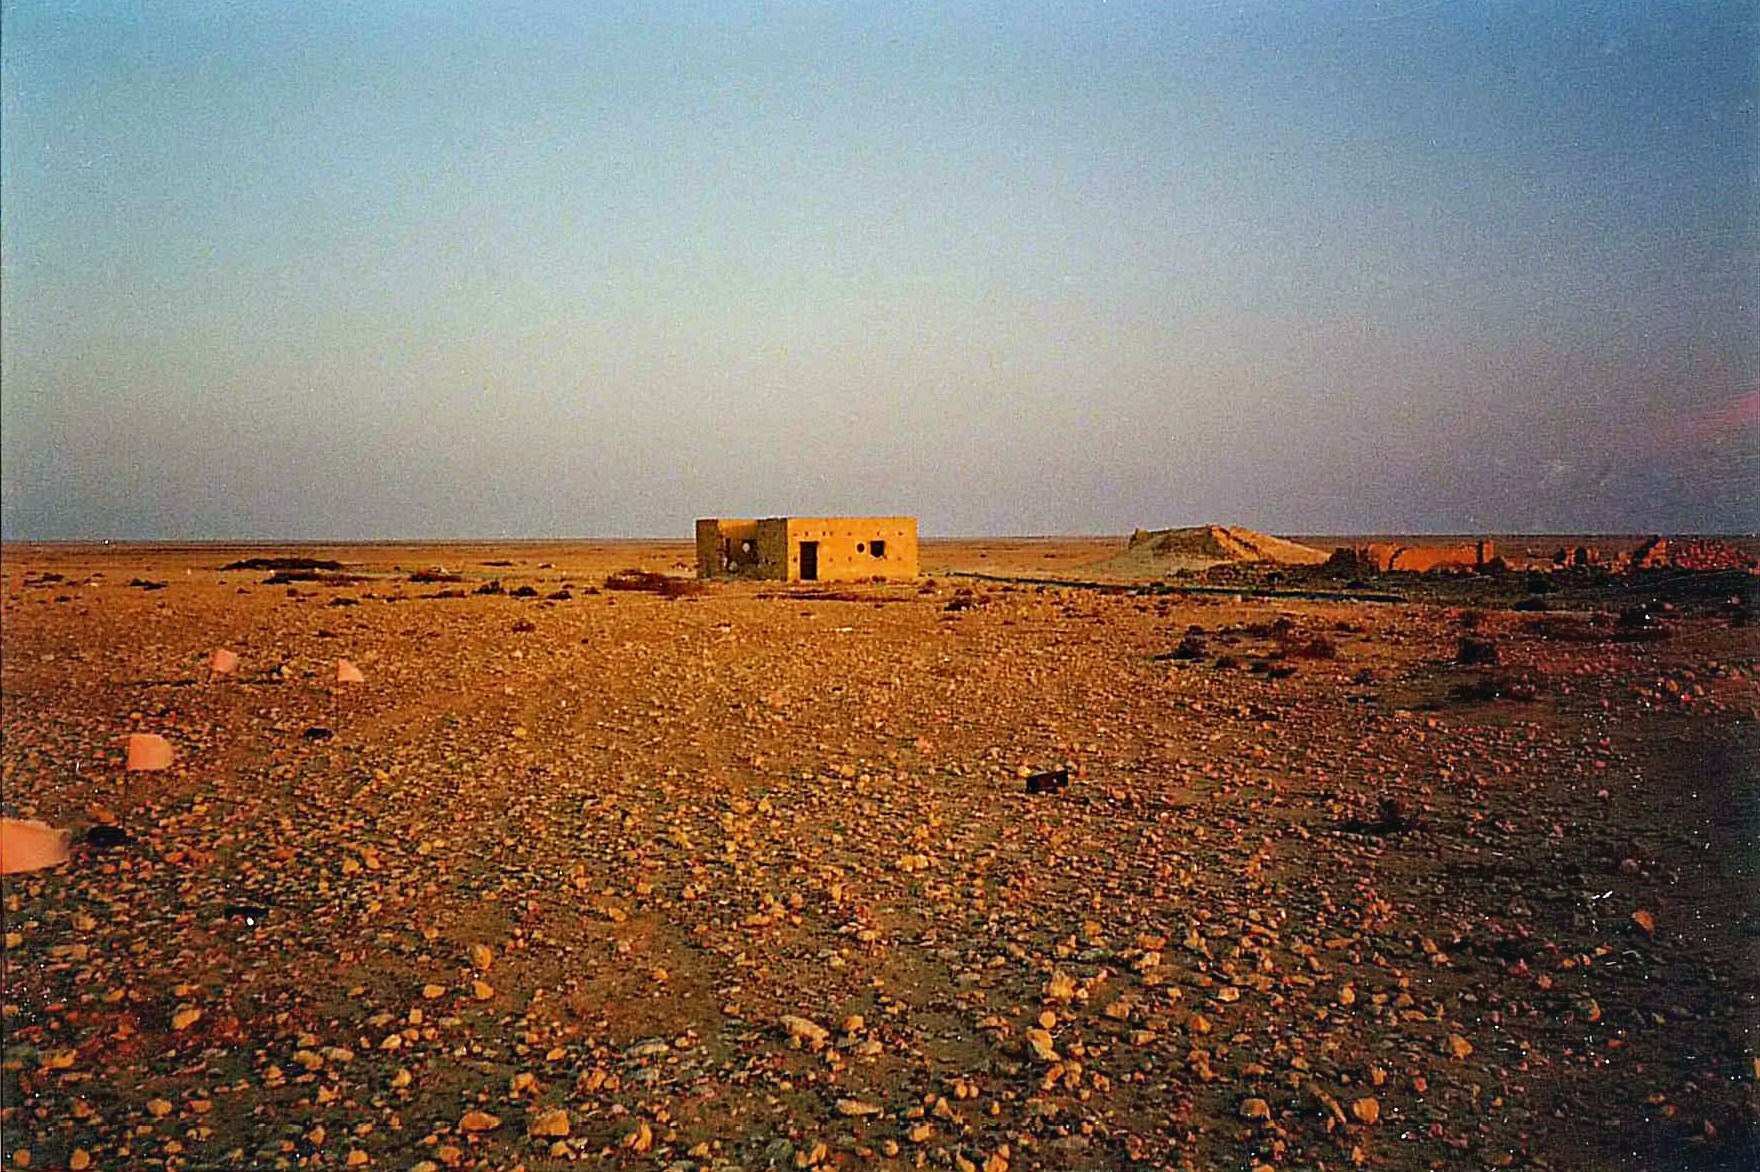

The ruins of the fort Bir Hakeim, taken 1990. The red flags indicate positions of land mines.
- André Lalande
- Pierre Messmer - later a gaullist Prime Minister of France
- Susan Travers - Koenig's mistress and later the only woman to officially serve in the French Foreign Legion
- Admiral Walter Cowan, Commando leader, and at the age of 70 one of the oldest actively serving British
- Raphaël Onana
- Dimitri Amilakhvari
- Gabriel Brunet de Sairigné
- Radomir Pavitchevitch
See also[]
Notes[]
- Footnotes
- Citations
- ↑ 1.0 1.1 1.2 1.3 Tricolor over the Sahara: the desert battles of the Free French, 1940-1942, Edward L. Bimberg, Greenwood Publishing Group, 2002, p. 109, 101
- ↑ 2.0 2.1 2.2 2.3 Der Mythos des Gaullismus: Heldenkult, Geschichtspolitik und Ideologie 1940 bis 1958, Matthias Waechter, Wallstein Verlag, 2006
- ↑ Ford, pp. 53-54; 42.
- ↑ The Second World War: Europe and the Mediterranean, Thomas B. Buell,John N. Bradley, Thomas E. Griess, Jack W. Dice, John H. Bradley, Square One Publishers, Inc., 2002, p. 169
- ↑ Ford, p. 64.
- ↑ Schlachtenmythen: Ereignis, Erzählung, Erinnerung, Susanne Brandt, p. 170
- ↑ (French) Histoire de la France militaire et résistante, Volume 1, Dominique Lormier, Rocher, 2000
- ↑ 8.0 8.1 Playfair, p. 216.
- ↑ Playfair, p. 218.
- ↑ 10.0 10.1 Playfair, p. 219.
- ↑ 11.0 11.1 LePage, p149
- ↑ Playfair, pp. 230-231.
- ↑ Charles de Gaulle, Mémoires de guerre, édition La Pléiade, p. 260.
- ↑ Lutz Koch, Rommel
References[]
- Jean-Louis Crémieux-Brilhac, La France Libre, NRF, Paris, 1996.
- Erwan Bergot, La Légion au combat, Narvik, Bir-Hakeim, Dièn Bièn Phu, Presses de la Cité, 1975
- Bimberg, Edward L. (2002). "Tricolor Over the Sahara". Greenwood Publishing Group. ISBN 978-0-313-31654-8.
- Buffetaut, Yves. La guerre du desert II: Bir-Hakeim. Armes Militaria Magazine HS 06. Paris, 1992
- Ford, Ken. Gazala 1942: Rommel's greatest victory. Osprey Publishing. Oxford, 2008 ISBN 978-1-84603-264-6
- Général Kœnig, Bir Hakeim, Ed. Robert Laffont, Paris, 1971.
- Lepage, Jean-Denis G.G. (2008). The French Foreign Legion: An Illustrated History. McFarlane & Company Inc. Jefferson, North Carolina. ISBN 978-0-7864-3239-4
- Dominique Lormier, Rommel: La fin d'un mythe, Ed. Le Cherche midi, Paris, 2003.
- Pierre Messmer, La bataille de Bir Hakeim, Revue Espoir, Paris, September 1986.
- Raphaël Onana, Un homme blindé à Bir-Hakeim, Ed. L'Harmattan.
- Playfair, Major-General I.S.O.; with Flynn, Captain F.C. (R.N.); Molony, Brigadier C.J.C. & Gleave, Group Captain T.P. (2004) [1st. pub. HMSO:1960]. Butler, Sir James. ed. The Mediterranean and Middle East, Volume III: British Fortunes reach their Lowest Ebb (September 1941 to September 1942). History of the Second World War, United Kingdom Military Series. Uckfield, UK: Naval & Military Press. ISBN 1-84574-067-X.
- Field Marshal Rommel, Archives Rommel, Herrlingen-Blaustein.
- Daniel Rondeau and Roger Stephane, Des hommes libres: La France Libre par ceux qui l'ont faite (Testimonies: Chapter 16, p. 243 and s.), Ed. Bernard Grasset, Paris, 1997.
Coordinates: 31°35′37.93″N 23°28′47.16″E / 31.5938694°N 23.4797667°E
External links[]
- (French) Article about the battle, by Jean-Philippe Liardet
- (French) Articles about four French units: 'La 13ème DBLE';'Le 1er RAMA';'Le 1er RFM';'Le BIMP'
- Fall of the Gazala Line
- Parliamentary Debates, House of Commons Official Report July 2, 1942
| Wikimedia Commons has media related to Battle of Bir Hakeim. |
The original article can be found at Battle of Bir Hakeim and the edit history here.