| King George V-class battleship (1939) | |
|---|---|
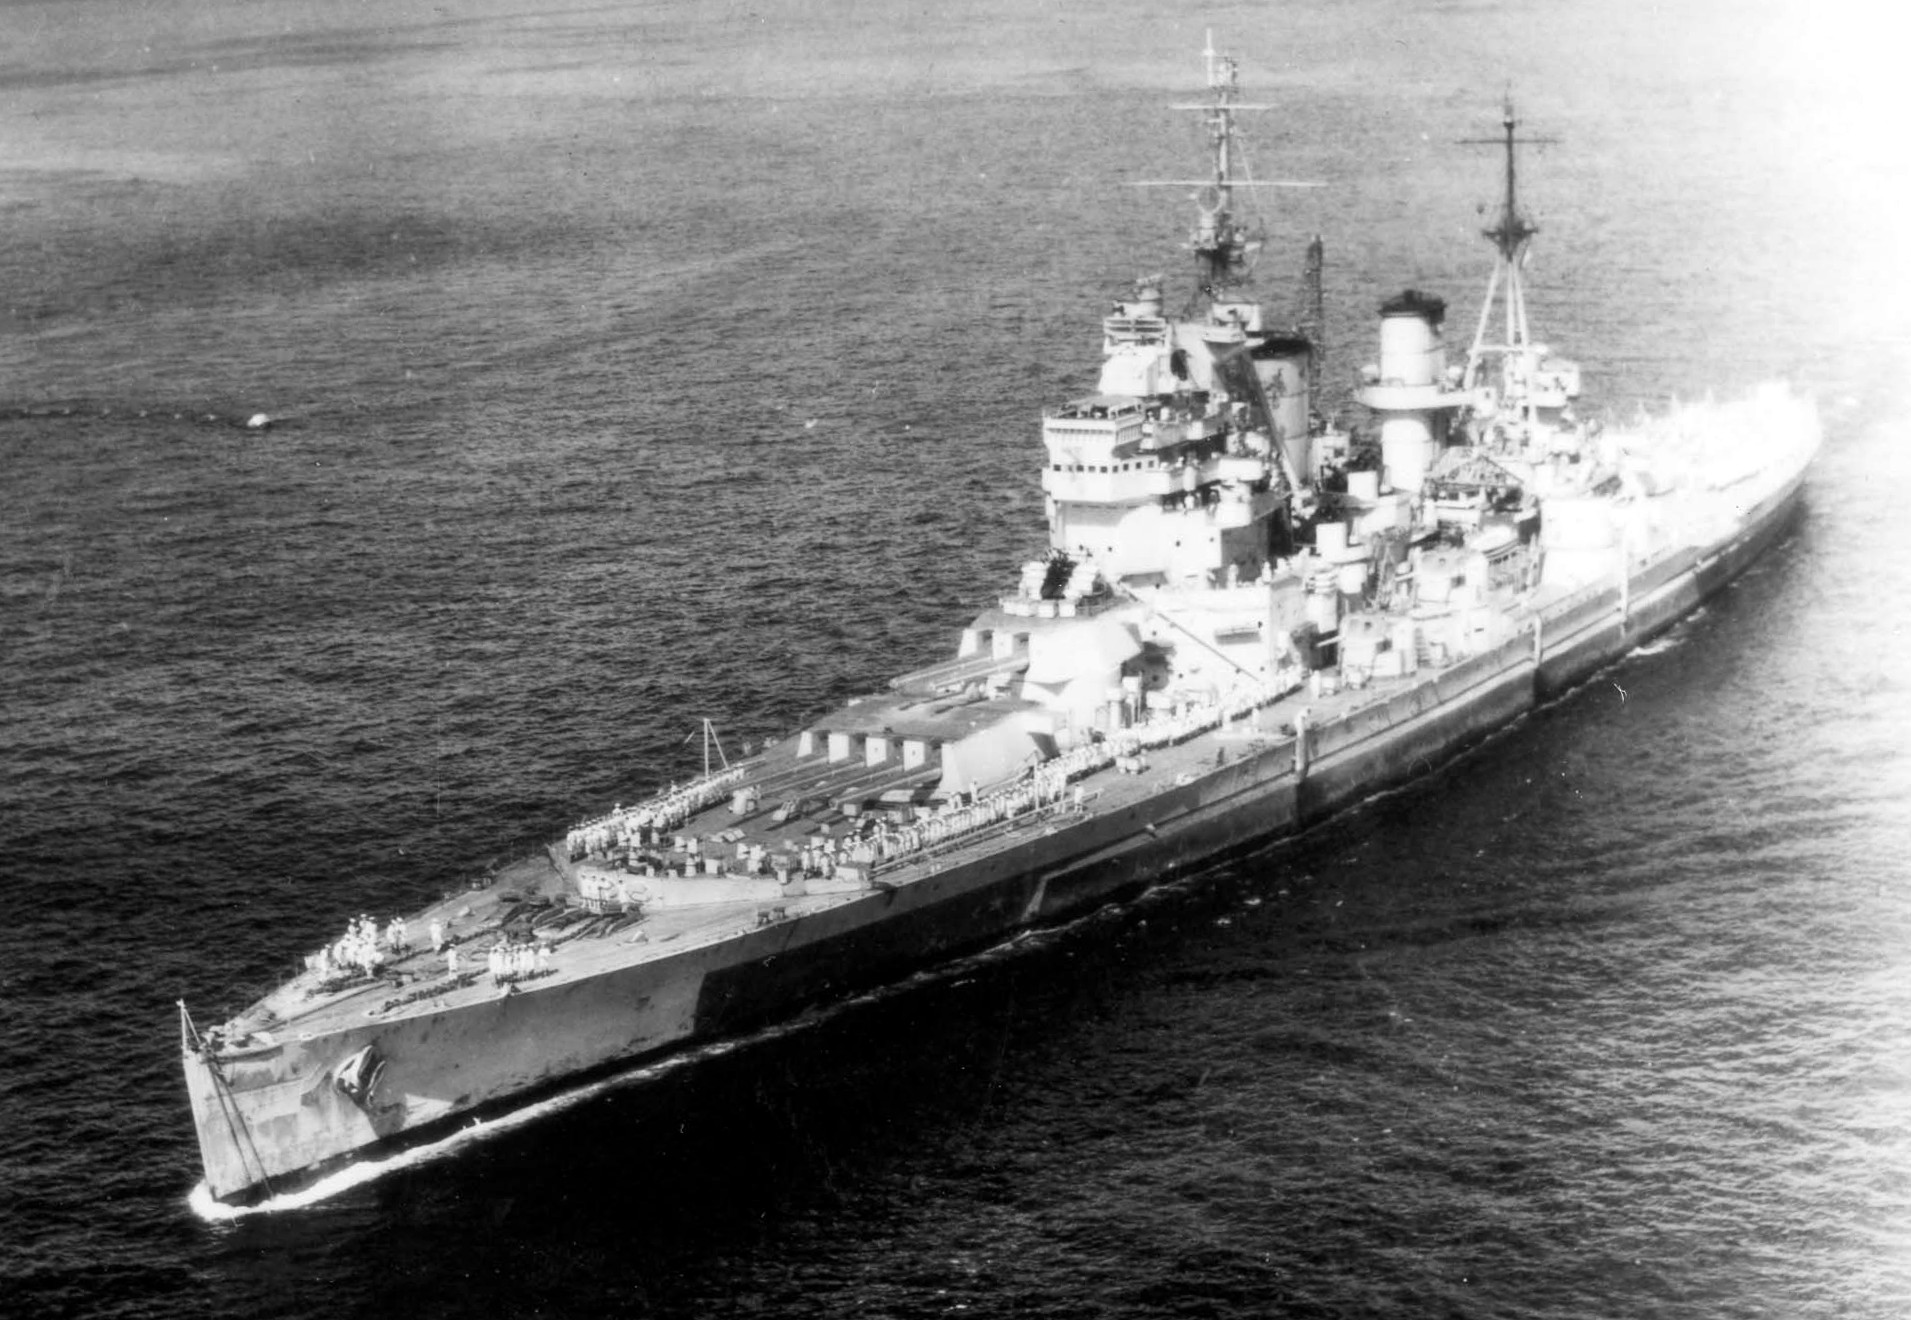 HMS King George V in 1945 | |
| Class overview | |
| Name: | King George V-class battleship |
| Operators: |
|
| Preceded by: | Nelson class |
| Succeeded by: |
Lion class (planned) HMS Vanguard (actual) |
| In commission: | 1940–1951 |
| Completed: | 5 |
| Lost: | 1 |
| Scrapped: | 4 |
| General characteristics (King George V) | |
| Type: | Fast battleship |
| Displacement: |
38,031 tons (1940) Standard 42,237 (1940) to 44,460 tons (1944) at Full Load |
| Length: | 745 ft (227.1 m) |
| Beam: | 103 ft (31.4 m) |
| Draught: | 32.6 ft (9.9 m) |
| Installed power: | 128,000–134,000 shp achieved in service[1] |
| Propulsion: |
4 shafts 4 Parsons geared turbines 8 Admiralty three-drum water-tube boilers |
| Speed: | 28.0 knots at 111,700 shp (1941 trials) |
| Range: | 5,400+ nm at 18 knots (11.9 tons/hour fuel burn) |
| Complement: | 1,314 to 1,631 |
| Armament: |
2 × 4, 1 × 2 – BL 14-inch Mk VII guns 8 × 2 – QF 5.25-inch Mk I guns 4 × 8 – QF 2-pounder "pom-pom" guns |
| Armour: |
Belt: 5.4–14.7 inches (137–373 mm) Deck: 5.88 inches (149 mm) Turrets: 12.75 inches (324 mm) Barbettes: 12.75 inches (324 mm) |
| Aircraft carried: | 4 Supermarine Walrus seaplanes |
| Aviation facilities: | 1 double-ended catapult |
The King George V-class battleships were the most modern British battleships used during World War II. Five ships of this class were commissioned: HMS King George V (1940), HMS Prince of Wales (1941), HMS Duke of York (1941), HMS Howe (1942) and HMS Anson (1942).
The Washington Naval Treaty of 1922 limited all of the number, displacement, and armaments of warships built following its ratification, and this was extended by the First London Naval Treaty but these treaties were due to expire in 1936. With increased tension between Britain, the United States, Japan, France and Italy, it was supposed by the designers of these battleships that the treaty might not be renewed and the ships of the King George V class were designed with this possibility in mind.
All five battleships served during World War II, with Prince of Wales and King George V being heavily involved in the pursuit and sinking of the German battleship Bismarck between 24 and 26 May 1941. Prince of Wales was later sunk by a Japanese air attack during her deployment to Singapore off the eastern coast of Malaya along with the battlecruiser HMS Repulse, making her the only ship of the class to be lost in combat. In 1943 Duke of York played a key role in sinking the German battleship Scharnhorst. This battle was also the last time that British and German capital ships fought each other during World War II. Howe and Anson had less notable careers as most of their careers were spent in the Arctic Circle providing distant cover for the numerous convoys to and from Russia. The four remaining ships were all deployed to the Pacific but Duke of York and Anson would both arrive too late to take part in hostilities, whilst King George V and Howe provided off-shore bombardment against such targets as the Ryukyu Islands. Following the end of World War II, the ships were slowly phased out of service and by 1957 all of the ships had been sold off for scrap; a process that was completed by 1958.
Design and description[]
The King George V class was the result of a design process that began in 1928. Under the terms of the Washington Naval Treaty of 1922, a "holiday" from building capital ships was placed in force through 1931. The battleships of the British Navy consisted of only those old battleships that had been kept after the end of World War I, plus the two new but slow Nelson-class battleships. In 1928, the Royal Navy started considering the requirements for the warships that it expected to start building in 1931.[2]
The First London Naval Treaty of 1930 extended the "shipbuilding holiday" through 1937. Planning began again in 1935, drawing on previous design work. The new class would be built up to the Treaty maximum displacement of 35,000 tons. Alternatives with 16-inch, 15-inch and 14-inch main guns were considered and the 15-inch armament was chosen. Most designs were intended to steam at 27 knots with full power, and it was decided that the likely decisive range in a battle would be from 12,000 to 16,000 yards. Armour and torpedo protection formed a much greater portion of the design than that of the previous Royal Navy battleships.[3]
In October 1935, the decision was made to use 14-inch guns. At the time, the United Kingdom was negotiating for a continuation of the Naval Treaties with the other parties of the London Treaty. The British Government favoured a reduction in the maximum calibre of battleship gun to 14 inches and in early October, the government learned that the United States of America would support this position if the Japanese could also be persuaded to do so. Since the large naval guns needed to be ordered by the end of the year, the British Admiralty decided on 14-inch guns for the King George V class.[3] The Second London Naval Treaty, a result of the Second London Naval Conference begun in December 1935, was signed in March 1936 by the United States, France and Britain and this set a main battery of 14-inch naval guns as the limit. The Japanese Empire left the conference in January and the Italian government of Benito Mussolini refused to sign the treaty.[4]
Propulsion[]
The King George Vs were the first British battleships to alternate engine rooms and boilers in the machinery spaces, which reduced the likelihood of one hit causing the loss of all power.[5] The machinery was arranged in four engine (turbine) rooms and four boiler rooms, with the 8 machinery compartments alternating in pairs of engine or boiler rooms. Each pair of boiler rooms formed a unit with a pair of engine rooms. Nominal full power was 110,000 shaft horsepower at 230 rpm with 400 pounds per square inch (28 bar) steam at 700 °F (371 °C).[6] The machinery was designed to operate at an overload power of 125,000 shp[7] and Prince of Wales' "...main machinery steamed at overload powers of 128,000 to 134,000 shaft horsepower with no difficulties..."[8] during the hunt for the Bismarck. The Admiralty boilers operated very efficiently and similar boilers of nearly identical power, fitted to HMS Warspite during her rebuilding in 1937, achieved a full power specific fuel consumption[Note 1] of 0.748 lb per shp on trials which compared favourably with contemporary battleships.[9][10] After 1942 the Royal Navy was forced to use fuel oils with considerably higher viscosity and greater seawater content than these boilers could efficiently use.[11] The poor quality of the oil fuel combined with the seawater contamination to reduce the efficiency of the steam power plant and increased the maintenance required.[12] By 1944 the specific full power fuel consumption had increased to 0.8 lb per shp and boiler maintenance was becoming increasingly difficult.[13] The Admiralty had been aware of this problem and were designing new types of oil sprayers and burners that could burn the available fuel oil much more efficiently, and sometime after 1944,[14] Duke of York and Anson were fitted with new, higher pressure, oil sprayers and burners that restored the boilers to full efficiency.[13] These same oil sprayers and burners were used in HMS Vanguard along with other detail improvements so that Vanguard achieved a full power specific fuel consumption of 0.63 lb per shp[15] while using the same steam pressures and temperatures as used on the King George V class.[16]
Protection[]
The armour protection of the King George V-class battleships was designed after consideration of the Royal Navy's experience of World War I and upon testing between the wars.[17] Magazine protection was given priority[18] through the provision of a thick belt and deck armour and by placing the magazines at the lowest levels of the ship.[19]
The horizontal protection over the magazines consisted of three layers with a total thickness of 9.13 inches; the weather deck consisted of 1.25 inches of D steel,[20] the main armoured deck was 5.88 inches thick over a .5-inch D[21] steel deck and above the shell rooms there was another 1.5-inch splinter deck.[22][23] The powder magazines were below the shell rooms for added protection, a practise that was begun with the Nelson-class battleships.[19] The weatherdeck thickness was the same over the machinery spaces but there the main armoured deck was reduced to 4.88 inches over a .5-inch D steel deck. The main armoured deck was continued forward of the forward armoured bulkhead and gradually reduced from full thickness to 2.5 inches, while aft of the after magazines an armoured turtle deck covered the steering gear with 4.5–5 inches of armour whilst also providing protection along the waterline.[22]
The main armour belt was 23.5 feet (7.2 m) high and covered the hull side from the main armoured deck to finish 15 feet (4.6 m)[18] below the deep waterline.[24] Post-World War I studies had indicated that it was possible for delayed-action AP shells to dive under a shallow belt and penetrate into vital areas of the ship and therefore the main belt was made to extend as far below the waterline as possible.[25] Along the ship, the belt started just forward of the forward turret and finished just aft of the aft turret. The belt was at its thickest above and at the waterline. Along the magazines, the belt was 15 inches thick (381 mm);[26] over the machinery spaces, the belt was 14 inches (356 mm). The lower section of belt tapered to a thickness of between 4.5 in and 5.5 in.[3][27] Armour protection was even better than the thickness of armour would indicate due to the improved qualities of the cemented[28] armour which provided excellent resistance.[29][30] The armoured belt, together with armoured bulkheads fore and aft and the armoured main deck, formed an "armoured citadel" protecting magazines and machinery. The armoured bulkhead was 12 in (305 mm) thick forward and 10 in (254 mm) thick at the after end of the citadel[22] The main armoured belt extended forward and aft of the main armoured bulkheads with reduced height to protect the waterline and gradually reduced in thickness from 13 to 5.5 inches.[22] Immune zone calculations vary widely from source to source.[31][32][33][34]
The main gun turrets were relatively lightly protected in comparison to contemporary battleships.[35] Maximum turret and barbette armour was reduced to 12.75 inches in this class from the 16 inches of the Nelson class. The turret faces had 12.75 in (324 mm) of armour at the front; 8.84 inches (225 mm) sides (at the gun chamber); 6.86 inches (284–174 mm) on the sides and rear; the roof plate was 5.88 in (149 mm) thick. The main armament barbettes were of varying thickness: 12.75 in (324 mm) thick on the sides, 11.76 in (298 mm) forward and 10.82 in (275 mm) aft of the turret. To some extent the higher quality of the armour minimized the loss of protection and the turret's flat face improved ballistic resistance at long ranges, while the low profile of the turret minimized target area at closer ranges. The reduction in turret and barbette armour was a compromise in favour of the thickest possible protection for the magazines.[18] The extensive anti-flash protection in the turrets and barbettes was designed to ensure that the magazines would remain safe even if the turrets and/or barbettes were penetrated.[19] The secondary gun mounts, casements and handling rooms received only light plating of 0.98 in (25 mm) to protect against splinters.[22][35]
Unlike contemporary foreign battleships and the preceding Nelson-class battleships, the King George V class had comparatively light conning tower protection with 4 inches (100 mm) inches sides, 3 in (75 mm) forward and aft and a 1.47 in (38 mm) roof plate.[22][36][37] The RN's analysis of World War I revealed that command personnel were unlikely to use an armoured conning tower, preferring the superior visibility of unarmoured bridge positions[18][38] Stability and weight considerations clearly played an important part in the British decision to limit superstructure armour. The conning tower armour was sufficient to protect against smaller ship guns and shell fragments.[39]
Underwater protection[]


Armour and underwater protection of King George V
The hull below the waterline, along the main armour belt, formed the Side Protection System (SPS). It was subdivided into series of longitudinal compartments in a void-liquid-void layout; the outer and inner were filled with air, and the middle compartment with liquid (fuel or water). The outer hull plating in the region of the SPS was made as thin as possible to minimize splinter damage in the event of a torpedo hit. The outer compartment of the SPS was normally an empty or void space (containing only air) and this allowed the initial explosion from a torpedo to expand while minimizing damage to the ship. The centre compartment was filled with oil or seawater and this spread the pressure pulse over a larger area while the liquid contained any metal splinters that were created from the torpedo explosion. The inboard compartment was another void space and served to contain any liquid leaking from the liquid layer and any remaining pressure pulse from the torpedo explosion. Inboard of the final void space was an armoured bulkhead which varied in thickness from 1.5 in (37 mm) over the machinery spaces to 1.75 inch (44 mm) abreast of the magazines. This bulkhead formed the "holding bulkhead" and it was designed to resist the residual blast effects from the torpedo hit. If this final inner bulkhead was penetrated a further set of subdivided compartments would contain any leaks; inboard of the holding bulkhead the ship was highly subdivided into small compartments containing auxiliary machinery spaces. The SPS void-liquid-void layer was generally about 13 feet wide, and the auxiliary machinery spaces added approximately another 8 feet of space from the outer hull plating to the major machinery spaces. The only exception to this was abreast A and B Engine Rooms, where the auxiliary machinery spaces were omitted, but another void space, about three feet wide was substituted in its place.[40] Above the SPS, and directly behind the armour belt, was a series of compartments, typically used for washrooms or storage spaces, which were designed to allow for upward venting of overpressure from a torpedo hit. This scheme was designed to protect against a 1000 lb warhead, and had been tested and found effective in full-scale trials.[41] The SPS was also a key component of the ship's damage control system, as lists resulting from flooding could be corrected by counterflooding empty void spaces, and/or draining normally liquid filled compartments. In the case of the loss of the Prince of Wales these spaces were used for counterflooding to reduce list.[42]
HMS Prince of Wales was sunk on 10 December 1941, from what was believed to have been hits by six aerial launched torpedoes[43] and a 500 kg bomb. However, an extensive 2007 survey by divers of the wreck of Prince of Wales determined definitively that there had been only 4 torpedo hits.[44] Three of these four hits had struck the hull outside the area protected by the SPS. In the case of the fourth, the SPS holding bulkhead appeared intact abreast the area where the hull was hit.[45] The conclusion of the subsequent 2009 paper and analysis[46] was that the primary cause of the sinking was uncontained flooding along "B" propeller shaft.[Note 2] The propeller shaft external shaft bracket failed, and the movement of the unsupported shaft then tore up the bulkheads all the way from the external propeller shaft gland through to B Engine Room itself. This allowed flooding into the primary machinery spaces. The damage and flooding was exacerbated by poor damage control and the premature abandonment of the after magazines and a telephone communications switchboard.[47] "B" propeller shaft had been stopped, and then restarted several minutes after being struck by a torpedo.[48] Subsequent inquiries into her loss at the time[49] identified the need for a number of design improvements, which were implemented to a lesser or greater degree on the other four ships of the class.[50] Ventilation and the watertightness of the ventilation system was improved, while internal passageways within the machinery spaces were redesigned and the communications system made more robust.[51] Improved propeller shaft glands and shaft locking gear was introduced.[52] Some of the supposed failures of the ship were nevertheless predicated on the assumption that a torpedo had hit and defeated the SPS at or about frame 206[53][54] at the same time as the hit that damaged B propeller shaft. The 2007 survey's [55] video footage evidence showed however that the hull is basically intact in this area.[56] The inability to survey the wreck during the war no doubt frustrated efforts[57] to arrive at a definitive cause for the loss of Prince of Wales and, subsequently, that somewhat flawed analysis[58] has led to a number of incorrect theories regarding the reasons for the sinking being inadvertently disseminated over the years.[59]
On examination of the Prince of Wales after her encounter with the German battleship Bismarck and the heavy cruiser Prinz Eugen, three damaging hits were discovered which had caused about 400 tons of water, from all three hits, to enter the ship.[60][61][62] One of these hits, fired from Bismarck, had penetrated the torpedo protection outer bulkhead in a region very close to an auxiliary machinery space causing local flooding within the SPS, while the inner, 1.5-inch ( 2x19 mm)[22][63][64] D-steel holding bulkhead, however, remained intact, as the German shell was a dud. The German shell would have actually exploded in the water if its fuse had worked properly,[65] due to the depth which the shell had to dive before striking the Prince of Wales under her armoured belt.[66]
Armament[]
Main armament[]


British 14-inch naval gun as used on King George V-class battleships. This example, never installed, is now on display at the Royal Armoury Fort Nelson, Hampshire, UK
The King George V and the four other ships of the class as built carried ten BL 14 inch Mk VII naval guns, in two quadruple turrets fore and aft and a single twin turret behind and above the fore turret.[67] There was debate within the Admiralty over the choice of gun calibre;[68] though there was little or no debate within Parliament;[69] other European powers preferred 15-inch, and the USN, 16-inch main guns.[70] Initially the Admiralty studied vessels armed with a variety of differing main armament layouts including nine 15-inch (381 mm)[71] guns in three turrets, two forward and one aft. While this was well within the capabilities of the British shipyards, the design was quickly rejected as they felt compelled to adhere to the Second London Naval Treaty signed in 1936, and there was a serious shortage of skilled technicians and ordnance designers, along with compelling pressures to reduce weight.[72] As a result, the class was designed to carry twelve 14-inch guns in three quadruple turrets and this configuration had a heavier broadside than the nine 15-inch guns. Unfortunately, it proved impossible to include this amount of firepower and the desired level of protection on a 35,000 ton displacement,[72] and the weight of the superimposed quadruple turret brought the stability of the vessel into question. In the end, the second forward turret was changed to a smaller two gun turret in exchange for better armour protection, reducing the broadside weight to below that of the nine gun arrangement.[72] The 14-inch Armour Piercing (AP) shell also carried a very large[73][74] bursting charge of 48.5 lb (22.0 kg)[75] The last naval treaty had an escalator clause that permitted a change to 16-inch guns if another signatory did not conform to it by 1 January 1937. Although they could have invoked this clause, the effect would have been to delay construction and it was considered prudent to build with 14-inch rather than find themselves without the new battleships. The U.S. opted to absorb a delay and built its ships with larger guns.[76]
In service, the quad turrets proved to be less reliable than was hoped for. Wartime haste in building, insufficient clearance between the rotating and fixed structure of the turret, insufficient full calibre firing exercises and extensive arrangements to prevent flash from reaching the magazines made it mechanically complex,[77] leading to problems during prolonged actions. In order to bring ammunition into the turret at any angle of training, the design included a transfer ring between the magazine and turret; this did not have sufficient clearance to allow for the ship bending and flexing.[78] Improved clearances, improved mechanical linkages, and better training[77] led to greater reliability in the quadruple turrets but they remained controversial.
During the battle of the Denmark Strait against the German battleship Bismarck, the main battery of the newly commissioned HMS Prince of Wales had mechanical problems: it started to fire three-round salvos instead of five-round salvoes, and there were problems in all except for the twin "B" turret.[79] The main battery output was reduced to 74 percent (Bismarck and Prinz Eugen achieved 89% and 85% output, respectively) during the engagement, as out of seventy-four rounds ordered fired, only fifty-five were possible.[80][81][82][83] 'A' turret was taking in water leading to discomfort for its crew[84] and "Y" turret jammed at salvo 20.[81][85] The number of known defects in the main armament that was hampering 14-inch fire, the damage sustained and the worsening tactical situation forced Captain Leach to disengage from combat.[86][87][88][89][90][91] With the range down to 14,500 yards and with five of his 14-inch guns out of action, Leach decided to break off his engagement with a superior enemy.[92] Roskill in the War at Sea (the official British history of the Second World War at sea), Volume 1, describes the decision to turn away: "In addition to the defective gun in her forward turret another 4 gun turret was temporarily incapacitated by mechanical breakdowns. In these circumstances Leach decided to break off the action and, at 0613, turned away under cover of smoke."[93][94] During the later action with Bismarck, HMS King George V was also having trouble with her main battery, and by 0927 every gun missed at least one salvo due to failures in the safety interlocks for antiflash protection.[95] John Roberts wrote of main gunnery problems encountered by King George V:
At 0847 Rodney opened fire...at a gun range of 23500 yards, followed by King George V one minute later at 24,600 yards...[96] Initially she [KGV] did well achieving 1.7 salvoes per minute while employing radar control but she began to suffer severe problems from 0920 onward [Note: KGV had opened fire at 0848 and fired for about 25 minutes at 1.7 salvoes per minute until 0913, when the type 284 radar broke down, but with no recorded loss of 14 inch gun output until 0920.[97]]. KGV recorded 14 straddles out of 34 salvoes fired from 0853 to 0913, when using her type 284 radar for ranging and spotting.[98] 'A' turret was completely out of action for 30 minutes [From 0920[99]], after firing about 23 rounds per gun, due to a jam between the fixed and revolving structure in the shell room and Y turret was out of action for 7 minutes due to drill errors... Both guns in B turret, guns 2 and 4 in A turret and gun 2 in Y turret were put out of action by jams and remained so until after the action – 5 guns out of 10! There were a multitude of other problems with mechanical failures and drill errors that caused delays and missed salvos. There were also some misfires – one gun (3 of A turret) misfired twice and was out of action for 30 minutes before it was considered safe to open the breech.
- —John Roberts, The Final Action[97]
During the early part of her action against the German capital ship Scharnhorst at the Battle of the North Cape on 26 December 1943, Duke of York, firing under radar control in poor weather, scored 31 straddles out of 52 broadsides fired and during the latter part she scored 21 straddles out of 25 broadsides, a very creditable gunnery performance. In total, Duke of York fired 450 shells in 77 broadsides. "However, HMS Duke of York still fired less than 70% of her possible output during this battle because of mechanical and "errors in drill" problems."[100]
The King George Vs were the only British battleships to use the 14-inch guns and turrets; their planned successors, free of treaty limitations, were to use a new 16-inch gun and triple mounts.
Secondary armament[]


Secondary battery 5.25-inch dual purpose turret of King George V
The QF 5.25 inch Mark I dual purpose gun has been dogged with controversy as well. The RN Gunnery Pocket Book published in 1945 states that: "The maximum rate of fire should be 10–12 rounds per minute.".[101][102] Wartime experience revealed that the maximum weight which the loading numbers could handle comfortably was much lower than 80–90 lb, and the weight of the 5.25-inch ammunition caused serious difficulties, allowing them to manage only 7–8 rpm instead of the designed 10–12 rpm.[103][104] The mount had a maximum elevation of +70 degrees.[104] The slow elevating and training speeds of the mounts were inadequate for engaging modern high-speed aircraft.[105] Despite these issues, Prince of Wales was credited with several 5.25-inch kills during Operation Halberd,[1] and damaged 10 of 16[106] high level bombers in two formations during her last engagement, two of which subsequently crash landed. Anson had her 5.25-inch turrets upgraded to RP10 control[107] which increased training and elevating speeds to 20 degrees per second.[Note 3] These ships were equipped with the HACS AA fire control system and the Admiralty Fire Control clock for surface fire control of the secondary armament.
Anti-aircraft battery[]
The King George V-class design had four 0.5-inch quadruple machine gun mounts, but in 1939 these were replaced by two Mark VI pom-pom mounts. In 1940, to combat air attack, four Unrotated Projectile mountings were fitted, one on "B" turret, two on "Y" turret, and one replaced a pom-pom mount added in 1939 at the stern. The pom-poms mounted in the King George V were designed and produced by Vickers Armstrongs as a result of a post-World War I requirement for a multiple mounting which was effective against close-range bombers or torpedo planes. The first model, tested in 1927, was superior to anything developed in other countries at the time and in 1938 the Mark VI* had a muzzle velocity of 2,400 feet per second, a 1.594-inch bore and a barrel length of 40 calibres. They fired a 1.8-pound shell at a rate of 96–98 rounds per minute for controlled fire and 115 rounds per minute for automatic fire.[108] The range of the Mark VI* was 6,800 yards, at a muzzle velocity of 2,300 feet per second.[108] The Mark VI octuple mount weighed 16 tons. The Mark VII quadruple mount weighed 10.8 tons if power operated; it could be elevated to 80 degrees and depressed to 10 degrees at a rate of 25 degrees per second which was also the rate of train. The normal ammunition supply on board for the Mark VI was 1,800 rounds per barrel.[109] King George V introduced the Mk IV Pom-pom director to the Royal Navy in 1940, becoming the first ship in the world to feature gyroscopic target tracking in tachymetric anti-aircraft directors.[110][111]
Fire control[]
The main guns of the King George V-class ships were controlled via two director control towers, one on top of the bridge superstructure and one aft of the mainmast, each of the control towers were equipped with 15 ft rangefinders and fed targeting information to an Admiralty Fire Control Table, Mk IX. In the event that the control towers were disabled both "A" and "Y" turrets had internal 41 ft rangefinders whilst "B" turret had 30 ft rangefinders. The first two ships of the class to be completed, King George V and Prince of Wales, carried four HACS Mk IVGB directors for the ship's secondary 5.25-inch guns as well as six Mk IV pom-pom directors; all ten of these directors featured Gyro Rate Unit, tachymetric fire control. Whilst the Duke of York and Howe had HACS Mk V directors, with Anson having the Mk V directors replaced for the updated Mk VI.[112]
Ships[]
| Name | Pennant | Namesake | Builder | Ordered | Laid down | Launched | Completed | Fate |
|---|---|---|---|---|---|---|---|---|
| King George V | 41 | King George V King George VI's father |
Vickers-Armstrong | 1 January 1937 | 21 February 1939 | 11 December 1940 (commissioned) |
Sold for scrap 1957 | |
| Prince of Wales | 53 | Prince of Wales former title of the King's brother. Traditional British warship name. |
Cammell Laird, Birkenhead | 29 July 1936 | 1 January 1937 | 3 May 1939 | 31 March 1941[Note 4] | Sunk 10 December 1941, South China Sea |
| Duke of York | 17 | Duke of York former title of the King |
John Brown and Company, Clydebank, | 16 November 1936 | 5 May 1937 | 28 February 1940 | 4 November 1941 (commissioned) |
Scrapped 1957 |
| Anson | 79 | George Anson | Swan Hunter | 20 July 1937 | 24 February 1940 | 22 June 1942 | Scrapped 1957 | |
| Howe | 32 | Richard Howe | Fairfields | 28 April 1937 | 1 June 1937 | 9 April 1940 | 29 August 1942 (commissioned) |
Scrapped 1958 |
Service histories[]
King George V[]
On 11 December 1940, she joined the Home Fleet at Scapa Flow. Her first task was to provide distant cover for Operation Claymore during February 1941 before escorting Atlantic convoys, HX 114 and HX 115 during March.[113] She was then sent to Iceland on 22 May to help locate the German battleship Bismarck.
On the morning of 24 May as Prince of Wales and HMS Hood engaged Bismarck, King George V was still 300 to 400 miles away and could not participate in the action.[114] On 26 May Bismarck was spotted by an RAF Catalina flying boat. The carrier HMS Ark Royal launched an air attack that evening. At 22:25 Swordfish torpedo bombers attacked Bismarck. One torpedo hit her steering gear, jamming it 15° to port. This resulted in her being only able to only steam in a large circle until some directional control was achieved through varying propeller speeds.
By 08:43 on 27 May King George V in company with HMS Rodney sighted Bismarck and opened fire at an initial range of 24,600 yards (22,500 m). By 08:59 King George V had closed to 16,000 yards (14,600 m). At 09:02 a shell from either King George V or Rodney disabled the hydraulic machinery in Bismarck's forward turrets "Anton" and "Bruno", forcing both turrets to cease fire. and by 09:13 Bismarck's forward and after Fire Control Directors were disabled. At 09:20, 32 minutes after opening fire, King George V began to have problems with her main battery but had still managed to fire 335 14-inch (35 cm) shells during the action. After Bismarck's sinking, owing to King George V being low on fuel she was ordered back to port, escorted by eleven destroyers to guard against German air or submarine attack.[115]
After the action against Bismarck, King George V operated with the Home Fleet on a variety of missions such as Operation EJ in October, which involved escorting HMS Victorious, whose aircraft attacked German shipping in the Glomfjord.[116] Following this she covered convoys to Russia and on 1 May 1942 she was operating with the USS Washington as an escort to convoy PQ 15, when she collided with the destroyer HMS Punjabi which had manoeuvred to avoid a mine and crossed King George V bow in a dense fog. Punjabi was cut in two and King George V had 40 feet of her bow badly damaged which resulted in the ship being sent to Gladstone Dock in Liverpool for repairs on 9 May and returning to Scapa Flow on 1 July 1942 to resume convoy escort duty.[115]
In May 1943, King George V was moved to Gibraltar in preparation for Operation Husky along with her sister-ship Howe. The two ships bombarded Trapani on July 12 and helped to defend against an air raid in Algiers prior departing for Operation Avalanche. Between 9 to 11 September, King George V provided support for Operation Slapstick and later escorted the surrendered Italian fleet, including the battleships Andrea Doria and Caio Duilio.[113][115][117][118]
In late March 1945, King George V began operations in the Pacific as part of Task Force 57 which included Howe, the aircraft carriers HMS Illustrious, HMS Indomitable, HMS Indefatigable, HMS Formidable and HMS Victorious, four cruisers and ten destroyers. On 4 May 1945, King George V led battleships and cruisers in a forty-five minute bombardment of Japanese air facilities in the Ryukyu Islands. In mid-July King George V was dispatched to join US battleships in a bombardment of industrial installations at Hitachi with King George V firing 267 rounds from her 14-inch guns during this operation. She fired her guns in anger for the last time in a night bombardment of Hamamatsu on 29 and 30 July 1945. Following the end of the war, King George V became the flagship of the Home Fleet until December 1946 when she became a training vessel. In 1957 it was decided that she should be scrapped and this was done by Arnott Young and Co. in Dalmuir.[117][119]
Prince of Wales[]
Upon completion in 1941, Prince of Wales, along with the battlecruiser Hood and six destroyers, was ordered to intercept the German battleship Bismarck if she attempted to break out of the Atlantic.[120] At 05:33 on 24 May contact was made with the Bismarck and the Prinz Eugen and Prince of Wales opened fire on Bismarck at 26,000 yards (23,800m), however, the initial salvos were over by approximately 1,000 yards (900m) as the neither the turret rangefinders nor the 15-foot (4.5m) control tower rangefinders could be used owing to the spray over the bow and poor visibility. Additionally, for reasons which have never been fully understood, both of Prince of Wales gunnery radar systems ( Type 284 and Type 281) failed to provide any usable ranges during the action; instead fire was directed from the control tower using estimated ranges based upon Bismarck's apparent height.[121] Prince of Wales sixth salvo straddled Bismarck and it was during this salvo that Prince of Wales landed her first of two decisive hits on Bismarck as one shell holed her bow and caused her to lose 1,000 tons of fuel oil, with the other shell entering Bismarck below her side armour belt and flooding her auxiliary boiler machinery room and forcing the crucial shutdown of two boilers which led to Bismarck making the ill-fated decision to attempt to return to port.[120] During this time the German ships concentrated their fire on Hood leading to her sinking at 06:01 with the loss of all but three of her 1,419 officers and men. At 06:02 Prince of Wales was hit by a 15-inch shell that entered the compass platform and killed the majority of personnel there, however, Captain Leach was unhurt.[122] At 06:05 Captain Leach decided to disengage and laid down a heavy smokescreen to cover Prince of Wale's retreat. At 18:16, Prince of Wales fired twelve salvos against the Bismarck at the extreme range of 30,300 yards (27,700m) and owing to this distance failed to land any hits. At 01:31 on 25 May Prince of Wales reengaged Bismarck with five salvos fired at an opening range of 20,000 yards (18,300m), using radar ranges, but landed no hits; shortly after this engagement contact was lost with Bismarck although Prince of Wales continued to search for Bismarck she was soon was forced to head for Iceland to refuel and would take no further part in actions against the Bismarck.[121][123][124][125]
After being repaired at Rosyth, Prince of Wales transported Prime Minister Winston Churchill to Newfoundland to attend a conference with US President Franklin D. Roosevelt during this conference the two leaders proclaimed the Atlantic Charter which laid out how the allies would deal with the post-war world.[126] Following this, Prince of Wales on 24 September along with numerous other ships provided escort for Operation Halberd. On 27 September the convoy was attacked by Italian aircraft with Prince of Wales shooting down several aircraft with her 5.25-inch (133 mm) guns.[126][127]
On 25 October 1941, Prince of Wales departed home waters bound for Singapore, with orders to rendezvous with the battlecruiser Repulse and the aircraft carrier Indomitable, however, Indomitable ran aground in Jamaica and was unable to proceed. On 2 December the group docked in Singapore and Prince of Wales then became the flagship of the ill-fated force Z under Vice-Admiral Sir Tom Phillips. On 9 December the force received orders to commence hostilities against the Japanese convoys that operated in the area.[128] The force then diverted to Malaya as they had received intelligence that Japanese forces were landing there, however, this was a diversion and at 02:11 10 December the force was spotted by a Japanese submarine.[128] At 11:00 the first Japanese air attack began against the force and at 11:30 Prince of Wales was struck by a torpedo, with Repulse managing to avoid all seven torpedoes aimed at her. The torpedo that struck Prince of Wales proved to be fatal as it wrecked the outer propeller shaft on the port aft side as well as destroying bulkheads along the shaft up to B Engine Room.[129] This led to rapid flooding and she began to take on a heavy list. Repulse after managing to avoid being hit by a third torpedo attack was to see her luck run out and she was hit several times in a fourth attack and sank at 12:33. The aircraft then turned their attention to Prince of Wales and she was hit by three more torpedoes before a 500 kilogram (1100 lb) bomb hit the catapult deck, penetrating through to the main deck before exploding in the make shift aid center causing numerous casualties. Several other bombs from this attack were very "near misses", which indented the hull, popped rivets and caused hull plates to "split" along their seams which further intensified the flooding aboard Prince of Wales. At 13:15 the order was given to abandon ship and at 13:20 Prince of Wales capsized and sank with Vice-Admiral Phillips and Captain Leach being among the 327 fatalities.[129] The wreck lies upside down in 223 feet (68 m) of water at 3°33′36″N 104°28′42″E / 3.56°N 104.47833°E and following the raising of the ships bell in 2002 by British technical divers Gavin Haywood and George McClure the ship's bell is on permanent display in the Merseyside Maritime Museum in Liverpool.[130]
Duke of York[]

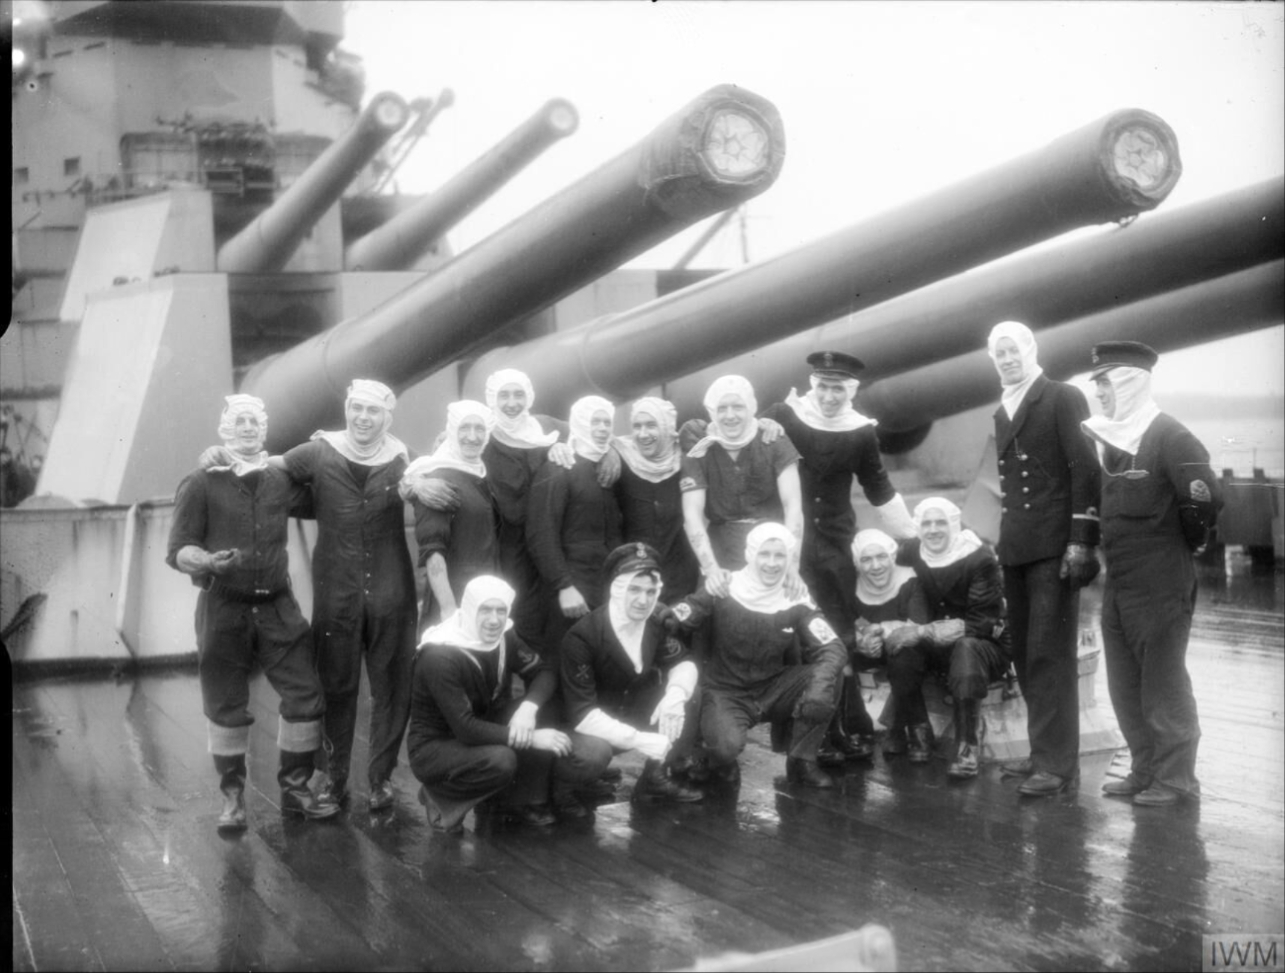
Gun crews of Duke of York under the ship's 14 inch guns at Scapa Flow after the sinking of the German battleship Scharnhorst on 26 December 1943.
Upon completion on 4 November 1941, Duke of York in mid-December 1941, embarked Prime Minister, Winston Churchill for a trip to the United States to confer with President Franklin D. Roosevelt.[131] Following this trip on 1 March 1942 she provided close escort for convoy PQ 12, and on 6 March this force was bolstered by Duke of York's sister-ship King George V as Admiral John Tovey believed that the German battleship Tirpitz might attempt to intercept the convoy. However, Tirpitz was prevented from reaching the convoy by aircraft from HMS Victorious.[131] In October 1942, Duke of York was sent to Gibraltar as the new flagship of Force H and helped support the Allied landings in North Africa in November.[132] On 14 March 1943 Duke of York resumed her status as flagship of the Home Fleet following King George V and Howe's departure for Operation Husky and in June 1943 Duke of York took part in Operation Gearbox which was designed to draw attention away from Operation Husky.[133][133] On 4 October, Duke of York and Anson covered a force of Allied cruisers and destroyers and the American carrier USS Ranger that raided German shipping off Norway. These attacks sank four merchant ships and badly damaged another seven.[134] In 1943 following the German battleship Scharnhorst relocating to Norway it was deemed necessary for all convoys bound for Russia to heavily protected by the ships of the Home Fleet. On 25 December 1943, Scharnhorst was reported at sea and contact was made by Force 1 cruisers, Belfast, Norfolk and Sheffield, however, by 9:30 following a brief engagement Scharnhorst had outdistanced her pursuers.[135] Meanwhile, Force 2, including the Duke of York was closing distance to Scharnhorst so that Scharnhorst was detected at 45,000 yards (41,500m) by Type 273 radar, and by 16:32 a Type 284 range was obtained at a distance of 29,700 yards (27,200m); by 16:50 Duke of York had closed to 12,000 yards (11,000m) when she fired a full ten-gun broadside that scored one hit. Scharnhorst despite being under heavy fire straddled Duke of York multiple times, throughout the action, and scored two hits over the course of the entire engagement, both through Duke of York's masts; one of which severed vital radar leads. At 16:55 Duke of York silenced Scharnhorst's turrets Anton and Bruno. Nevertheless, despite this damage, Scharnhorst maintained speed and by 18:24 had opened the range between the two ships to 21,400 yards (19,500m), after which Duke of York ceased fire, having fired fifty-two broadsides. Unfortunately for Scharnhorst, but luckily for Duke of York, one shell from the final salvos had hit and exploded in Scharnhorst's number one boiler room, slowing Scharnhorst, and allowing the pursuing destroyers to overtake Scharnhorst.[136][137] Following this, Force 2's destroyers then attacked with torpedoes, firing 28 in total, which scored 3 hits to significantly slow Scharnhorst so that by 19:01 Duke of York was again able to open fire at a range of 10,400 yards(9,500m). By 19:16 all of Scharnhorsts main turrets had been silenced, allowing Duke of York to cease fire at 19:30, and the destroyers were then ordered to close and finish the Scharnhorst with torpedoes. At 19:45 Scharnhorst sank with loss of over 1,700 men.[131][138][139] Following this action, Duke of York on 29 March 1944 along with the rest of the Home Fleet provided cover for convoy JW 58[140] and in August provided cover for aircraft carriers conducting air strikes against the Tirpitz.[141] Duke of York was then ordered to join the British Pacific Fleet but electrical problems delayed her arrival and by the time she arrived in Sydney on 29 July, she was too late to take any part in hostilities. Along with King George V, Duke of York was present in Tokyo Bay for the surrender of Japanese forces.[142] After returning to Britain she was made flagship of the Home Fleet until April 1949 and on 18 Mar 1957 she was ordered to be scrapped and was broken up by Shipbreaking Industries, Ltd, in Faslane.[143][144]
Howe[]
Upon completion on 29 August 1942 Howe was placed into the Home fleet to help provide cover for convoys bound for Russia. On 31 December 1942 Howe along with King George V provided distant cover for convoy RA. 51 as well as providing cover for convoy RA.53 on 1 March 1943.[145][146] Following this, Howe was relocated to Gibraltar along with King George V to take party in Operation Husky, the two ships shelled Trapani naval base and Favignana during 11–12 July.[147] The pair also provided cover during Operation Avalanche beginning on 7 September and on 14 September Howe and King George V escorted the surrendered Italian battleships Vittorio Veneto and Italia to Alexandria.[148][149] On 1 April 1945, Howe along with Task Force 113 was provided off-shore bombardment in support of Operation Iceberg. During this operation the force came under attack by sporadic Japanese kamikaze attacks, however, Howe was unscathed and succeeded in shooting down a kamikaze plane. Following these actions in the Pacific, Howe returned to Portsmouth in January 1946 where she was to spend the remainder of her career until she was ordered scrapped in 1957 and on 27 May 1958 she was towed to Inverkeithing to be broken up by T. W. Ward and Co.[150]
Anson[]
Upon completion in 1942, Anson like Howe would spend most of her career covering convoys bound for Russia. On 12 September 1942, Anson along with Duke of York provided distant cover for convoy QP. 14 and on 29 December 1942 Anson provided cover for Convoy JW 51B.[151][152] On 29 January 1943 Anson covered her last convoy before being relocated to the Mediterranean which was Convoy RA 52.[153] In July 1943 Anson took part in diversionary moves designed to draw attention away from Operation Husky.[142] In 1944 Anson provided cover for the aircraft carrier HMS Furious whilst it carried out air strikes against German targets in Norway as part of Operation Bayleaf and on 3 April she provided cover for Operation Tungsten, which succeeded in damaging the German battleship Tirpitz.[140][142] Following this, Anson along with her remaining sister ships where sent to the Pacific but unlike her sister-ships she did not fire her guns in anger, on 15 August Anson along with Duke of York accepted the surrender of the Japanese forces occupying Hong Kong and she was also present during the official Japanese surrender in Tokyo Bay. After hostilites ended, Anson briefly served as the flagship of the 1st Battle Squadron of the British Pacific Fleet and helped to re-occupy Hong Kong.[142] In November 1949, Anson was placed into reserve and in 1957 she was purchased for scrap by Shipbreaking Industries, Faslane.[154]
References[]
- Notes
- ↑ Full power specific fuel consumption is a measure of power plant efficiency. It is calculated by dividing fuel consumption in pounds per hour, into the shaft horse power produced by the turbines.
- ↑ B was the outermost shaft on the port side
- ↑ Unmodified the training speed was 10 degrees per second
- ↑ Commissioned on 19 January 1941
- Citations
- ↑ 1.0 1.1 Garzke & Dulin, p. 191
- ↑ Brown, p. 25
- ↑ 3.0 3.1 3.2 Brown, pp. 28–29
- ↑ Raven and Roberts, p. 275
- ↑ Brown, pp. 164–165
- ↑ Journal of Naval Engineering
- ↑ Dumas, Warship, The King George V Class, Part 1, P14
- ↑ Garzke & Dulin, p. 206
- ↑ R&R, Ensign Four, Queen Elizabeth Class Battleships, p34
- ↑ Garzke & Dulin, p. 66. The French battlecruiser Dunkerque achieved 0.753 lb/hr and 0.816 lb/hr on her preliminary and full power trials, respectively, in 1936.
- ↑ Gray and Killner, JNE, Volume 2, Book 4, January 1949, Sea Water Contamination of Boiler Fuel Oil – Part II
- ↑ JNE, Recent Improvements in Oil-Burning Equipment, Parts I, II, & III. The high seawater content was caused by a number of factors; the King George V class used fuel oil as part of the Side Protection System in the liquid layers of the SPS. As the fuel was consumed, water was allowed to enter the bottom of the layer to maintain its defensive qualities. The low viscosity fuel used in the early part of war resisted mixing with seawater and what seawater contamination did occur was easily removed. Additionally Britain's oil tanker fleet was relatively intact. After 1942 oil tanker losses to enemy attacks increased and the demands for more aviation fuel led to a degradation of bunker fuel used in steam driven naval vessels. This fuel readily absorbed seawater from older oil tankers that had increased propensity for seawater leakage, and from contact with seawater in the SPS system. It was also very much more difficult to remove the seawater once this poorer quality fuel was contaminated.
- ↑ 13.0 13.1 JNE, Recent Improvements in Oil-Burning Equipment
- ↑ JNE, Recent Improvements in Oil-Burning Equipment. Possibly post-war.
- ↑ Raven and Roberts, p. 339
- ↑ Garzke & Dulin, pp. 236–297.
- ↑ Raven and Roberts, p. 263
- ↑ 18.0 18.1 18.2 18.3 Raven and Roberts, p. 415
- ↑ 19.0 19.1 19.2 Raven and Roberts, p. 285
- ↑ Okun, Nathan. Armor protection of the battleship KM Bismarck. D or Ducol steel was a High Tensile Steel developed after WW1. It had very good armour properties and was used extensively on the King George V-class battleships as a support for deck and belt armour and for hull, deck and splinter proof plating.
- ↑ Okun, Nathan. Armor protection of the battleship KM Bismarck.
- ↑ 22.0 22.1 22.2 22.3 22.4 22.5 22.6 Raven and Roberts, p. 284
- ↑ Garzke & Dulin, pp. 252–255
- ↑ Raven and Roberts, p. 154.
- ↑ Garzke & Dulin, p. 230: "The armour thicknesses and underwater protection scheme evolved from tests completed prior to design work...tests on SMS Baden, HMS Superb, HMS Monarch, and Empress of India [sic] led to the conclusion that side armour should extend as far below the standard load waterline as practicable."
- ↑ specifically 14.7 inches of cemented armour, composite material and 0.88 inches Ducol steel hull plate
- ↑ Breyer, pp. 182–184
- ↑ face hardened
- ↑ Garzke (1980), p. 247: "Side armour protection of these ships was better than indicated in mere thickness tabulations, as the excellent quality of British Cemented armour provided the resistance of about 25% greater thickness of US Class "A" armour."
- ↑ "Bismarck Armour". http://www.kbismarck.com/proteccioni.html. "Post WWII proving ground test indicated that KC was only slightly less resistant than British cemented armour (CA), and markedly superior to US Class A plates."
- ↑ ADM 239/268: C.B.04039, Armour Protection (1939)
- ↑ Raven and Roberts, p. 293 state:"...it was estimated that the belt armour would withstand 15 inch shells at a range of about 13,500 yards (15 inch armour) and 15,600 yards (14 inch armour) at normal inclination...". The Magazines were stated to withstand 15-inch plunging fire up to 33,500 yards.
- ↑ Garzke & Dulin (1980), p. 251, state: Against the British 15 inch Mark I naval gun, firing an 1,938 lb shell, this protection scheme provided an immunity zone from 17,200 to 32,000 yards over the magazines, 19,500 to 28,000 yards over the machinery.
- ↑ Okun, Nathan. Armor protection of the battleship KM Bismarck. Nathan Okun calculated against the German 38 cm SK C/34 naval gun (15 inch) mounted on the contemporary Bismarck-class battleships, the immunity zone was from 21,500 to 36,600 yards yards over the magazines, 23,800 to 33,200 yards yards over the machinery. Okun's calculations omit the 1.5" splinter deck over the magazine, as his article states that there is no armour over the magazines below the 5.88" armour deck.
- ↑ 35.0 35.1 Garzke & Dulin (1980), pp. 252–255
- ↑ Burt, p. 389. Side and front data from Burt, rest from Garzke.
- ↑ Garzke & Dulin (1980), p. 252
- ↑ Testimony of Ted Briggs. For example, Captain Kerr and Admiral Holland commanded the Hood from her unarmoured bridge.
- ↑ Garzke & Dulin (1980), p. 247
- ↑ Raven and Roberts, pp. 294–297.
- ↑ Brown, pp. 30–31
- ↑ Death of a Battleship p. 17
- ↑ Middlebrook & Mahoney, p. 288. The figure of six hits seems to stem from post sinking analysis, probably by the Bucknill Committee and some survivor reports. However Appendix 1, Prince of Wales Compass Platform Narrative (recorded during the action) on pages 329–330, states four torpedo hits, one on the port side and three on the starboard side. Appendix 4, Post Action Statement by Gunnery Officer of HMS Prince of Wales, pages 338–339, by Lt Cdr McMullen, also states one torpedo hit on the port side and three on the starboard side.
- ↑ "Expedition 'Job 74', page 10" (pdf). http://www.explorers.org/expeditions/reports/Flag_Reports_PDF/Flag%20118%20-%20Kevin%20Denlay%20-%20Update.pdf.
- ↑ Garzke, Dulin and Denlay. "Death of a Battleship" (pdf). p. 35. http://www.rina.org.uk/c2/uploads/death%20of%20a%20battleship.pdf.
- ↑ Death of a Battleship, Garzke, Dulin and Denlay
- ↑ Garzke, Dulin & Denlay, pp. 15–20
- ↑ Garzke, Dulin & Denlay,
- ↑ Middlebrook, p. 310: "...the Second Bucknill Committee started its sittings...on 16 March 1942."
- ↑ Raven and Roberts, p. 388
- ↑ Raven and Roberts, p.297
- ↑ Garzke & Dulin, p. 247
- ↑ Garzke & Dulin p. 368. Frame 206 is the location of a bulkhead that runs across the ship from port to starboard, about 1/3 of its length from the stern and separates Y Action Machinery Room from the Port Diesel Dynamo room. 'B' Engine Room begins about 20 feet forward of frame 206.
- ↑ Middlebrook, pp. 198–203 Middlebrook also assumed a hit at frame 206 based upon the Bucknill Committee analysis but discounted the likelihood of defeat of the SPS.
- ↑ "Expedition 'Job 74'" (pdf). http://www.explorers.org/expeditions/reports/Flag_Reports_PDF/Flag%20118%20-%20Kevin%20Denlay%20-%20Update.pdf.
- ↑ Death of a Battleship, Garzke, Dulin and Denlay. While the hull area around Frame 206 is indented, and with split seams and popped rivets, there is no torpedo hole. See 3D images made from the study of Expedition 'Job 74' video footage.
- ↑ Middlebrook, p. 311: "The committee could not have known two things: first, that the Japanese torpedoes contained only 330 or 450 lb of explosive charge (which knowledge would have only increased their dilemma) and secondly, that the extensive damage and flooding had been caused not by the explosion seen on Prince of Wales's port side abreast frame 206 but by the unseen torpedo hit underneath the stern. This was the torpedo that damaged the bracket of the port-outer shaft, distorted the shaft itself, and permitted the vast inrush of water. It is small wonder that the committee was baffled..."
- ↑ The Bucknill Committee Inquiry, 1942
- ↑ Garzke & Dulin, p. 241. This volume, for example, proposed three alternative theories based upon a torpedo hit or hits at frame 206 that defeated the SPS.
- ↑ ADM267/111 Battle Damage Sustained by H.M.S. Prince of Wales, 24 May 1941:"About 400 tons water in ship mainly abaft after bulkhead"
- ↑ Garzke & Dulin, p. 190, states that Captain Leach had informed Admiral Wake-Walker "...best speed was 27 knots because of 600 tons of flooding water...", but this is contradicted by the official damage report, ADM 267/111.
- ↑ 234/509: Sinking of the 'Bismarck', 27 May 1941: Official Despatches, paragraph 24: "The effects of all this on her gunnery had been witnessed by the Rear-Admiral (Wake-Walker) Commanding, First Cruiser Squadron, and he knew, in addition, that her bridge was seriously damaged, that she had taken in 400 tons of water aft..."
- ↑ Garzke & Dulin, pp. 252, 234: "*Two plate construction"
- ↑ Tarrent, p. 31
- ↑ Nathan Okun. "Underwater Projectile Hits". http://www.navweaps.com/index_tech/tech-041.htm.
- ↑ Burt, p. 415
- ↑ Garzke & Dulin, p. 176
- ↑ Roskill, Naval Policy between the wars, volume II pp. 327–329.
This describes a normal debate within the Admiralty regarding gun size, armour, speed, torpedo protection and AA firepower and what should be the correct ratio between these attributes for the King George V battleships. In the end the Admiralty chose a ship with high speed, enhanced protection, heavy AA and 10 14-inch guns. The Admiralty controller wrote that a change to 15-inch guns would entail an 18-month delay (which would have meant no new RN battleships until 1942). Roskill noted that the London Naval Treaty stipulated a 14-inch maximum gun size, with an opt out clause, which Britain was very reluctant to exercise, since the Admiralty was hoping to persuade the other naval powers to stick to 14-inch guns. - ↑ Hansard HC Deb 20 July 1936 vol 315 cc32-3
Hansard HC Deb 20 July 1937 vol 326 cc2001-53
Hansard HC Deb 20 July 1937 vol 326 cc2054-65 London Navy Treaty Bill.
The member from Epping, Mr Churchill, criticised the choice of 14-inch main armament, as the US and Japan were believed to have selected 16-inch guns for their new ships, see also: Garzke & Dulin, p. 227 - ↑ Garzke & Dulin, p. 227
- ↑ Garzke & Dulin, pp. 167–170
- ↑ 72.0 72.1 72.2 Garzke & Dulin, p. 175
- ↑ Naval Weapons index, The KM 38 cm/52 SK C/34 carried a 41.4lb bursting charge, while the USN 16-inch Mk VI 2700 lb AP shell carried a 40.9lb bursting charge
- ↑ USN Bureau of Ordnance, Naval Ordnance 1937 Edition, paragraph 1318: "The impact damage which a projectile itself does is entirely secondary to that which results from its burst. The design of most naval projectiles is based primarily on using the projectile as a vehicle with which to carry a quantity of explosive into a ship and secondarily to provide missiles with which to carry the force of the explosion."
- ↑ Tony DiGiulian. "British 14"/45 (35.6 cm) Mark VII". NavWeaps. http://www.navweaps.com/Weapons/WNBR_14-45_mk7.htm.
- ↑ Friedman, pp. 270–271
- ↑ 77.0 77.1 Garzke & Dulin, p. 228
- ↑ Brown Nelson to Vanguard (2000) p31
- ↑ Tarrant, V.E. (1991). King George V-class battleships. London: Arms and Armour Press, p. 59. Tarrant notes, on page 63 that "Information on Prince of Wales Gunnery is from PRO Adm 234/509"
- ↑ Asmussen, John. "The Battle of the Denmark Strait". http://www.bismarck-class.dk/bismarck/history/bisdenmarkstraitbattle.html. "Bismarck and Prinz Eugen also suffered a loss of output. Bismarck had a "total 104 possible shots Actually fired = 93". Prinz Eugen "Total 184 possible shots Actually fired = 157""
- ↑ 81.0 81.1 Garzke and Dulin, 1980. pp. 189–190.
- ↑ Tarrant, V.E. (1991) p. 59
- ↑ ADM 234/509: H.M.S. Prince of Wales' Gunnery Aspects of the "Bismarck" Pursuit. hmshood.org.uk. http://www.hmshood.org.uk/reference/official/adm234/adm234-509guns.htm. "This document is a modern transcription of a portion of Admiralty record ADM 234/509"
- ↑ Tarrant, V.E. (1991). King George V-class battleships. London: Arms and Armour Press, p. 54
- ↑ ADM 234/509: H.M.S. Prince of Wales' Gunnery Aspects of the "Bismarck" Pursuit. http://www.hmshood.org.uk/reference/official/adm234/adm234-509guns.htm. Problems in Prince of Wales' turrets during her first action against Bismarck, according to her Gunnery Aspects Report: "A" Turret: No. 1 gun failed after the 1st salvo, from a previously known defect. No. 2 and no.4 guns suffered from intermittent safety interlock problems. "A" turret suffered from water entering the lower portion of the turret/barbette structure, but there is no indication that this caused any problems other than discomfort for the crew. At Salvo 18, when Prince of Wales turned away, 3 of 'A' turret's guns were in operation. "B" Turret: No problems reported. At Salvo 18, when Prince of Wales turned away, both (2) of 'B' turrets guns were in operation. "Y" Turret No. 2 gun had loading problems and missed salvo 14 onwards. No.3 gun had problems with safety interlocks causing it to miss salvoes 15 to 20. At salvo 18 when Prince of Wales turned away, 2 of "Y" turrets guns were in operation. "Y" turrets shell transfer ring jammed at salvo 20, due to a shell sliding out of its tray due to the motion of the ship as Prince of Wales turned.
- ↑ Garzke & Dulin (1980), p. 190.
- ↑ The Bismarck Episode by Russel Grenfell, p. 54
- ↑ The loss of the Bismarck, by Graham Rhys-Jones, pp. 119–20
- ↑ German Capital Ships and Raiders in WW2, A naval Staff History, Battle Summary 5, p. 8
- ↑ Antonio Bonomi & translated by Phil Isaacs (23 September 2006). "The Battle of the Denmark Strait, May 24th 1941 Part 2 - The Battle". hmshood.org.uk. http://hmshood.com/history/denmarkstrait/bonomi_denstrait2.htm.
- ↑ The Battle of the Denmark Strait by John Asmussen
- ↑ Bennett, Naval Battles of WW2, p. 141
- ↑ Roskill SW, The War at Sea, Volume 1: The Defensive, 1954 p. 406
- ↑ Axis Battleships of WW2, Garzke and Dulin, p. 190, states: "As Prince of Wales turned away at 0613, Y turret jammed, temporarily leaving only two out of ten 14 inch guns operational". This is not supported by Bennett, Roskill and ADM 234–509.
- ↑ Garzke & Dulin (1980), pp. 213–214: "At 0927 a shell hit the Bismarck...By that time KGV was having trouble with her main battery and every gun missed at least one salvo..."
- ↑ The Final Action by John Roberts, Warship 28, p. 264
- ↑ 97.0 97.1 The Final Action by John Roberts, Warship 28, pp. 264–268
- ↑ The Final Action by John Roberts, Warship 28, pp. 264–265
- ↑ The Final Action by John Roberts, Warship 28, p. 268
- ↑ British 14"/45 (35.6 cm) Mark VII navweaps.com
- ↑ The Gunnery Pocket Book. 1945. p. 51. http://www.hnsa.org/doc/br224/part1.htm#par159.
- ↑ The Gunnery Pocket Book. 1945. p. 51. "These guns are combined High Angle and Low Angle Guns. The Mark II Mounting is found in all Dido-class cruisers. The Mark I Mounting is found in King George V-class battleships, where they fulfil the combined functions of H.A. Long Range Armament and Secondary Armament against surface craft. The main differences between the two mountings lie in the arrangements of the shellrooms and magazines, and the supply of ammunition to the guns. In this chapter, only the Mark II Mounting, as found in Dido-class cruisers, is discussed. The 5.25 in. calibre with separate ammunition is used for dual High Angle and Low Angle Armament, since it gives the reasonable maximum weight of shell which can be loaded by the average gun's crew for sustained periods at all angles of elevation. The maximum rate of fire should be 10–12 rounds per minute."
- ↑ Campbell, 1985. p. 44
- ↑ 104.0 104.1 Williams, Anthony G. "Medium Calibre guns of the Royal Navy in World War II". http://www.quarry.nildram.co.uk/MCGWW2.html.
- ↑ Naval Weapons of the World From 1880 to Today – British 5.25"/50 (13.4 cm) QF Mark I
- ↑ Garzke and Dulin. Allied Battleships in WW2. pp. 195, 206–207.
- ↑ Campbell, p. 45
- ↑ 108.0 108.1 Campbell p. 71
- ↑ Garzke p. 229
- ↑ Campbell, p.33.
- ↑ Raven and Roberts, p.291
- ↑ Raven and Roberts p. 284
- ↑ 113.0 113.1 Chesneau, p. 7
- ↑ Garzke, p. 209
- ↑ 115.0 115.1 115.2 Garzke, p. 214
- ↑ HMS KING GEORGE V – King George V-class 14in gun Battleship
- ↑ 117.0 117.1 Chesneau, p. 10
- ↑ Molony, pp. 242–243
- ↑ Garzke, p. 215
- ↑ 120.0 120.1 Garzke, pp. 177–179
- ↑ 121.0 121.1 ADM 234/509: H.M.S. Prince of Wales' Gunnery Aspects of the "Bismarck" Pursuit. http://www.hmshood.org.uk/reference/official/adm234/adm234-509guns.htm.
- ↑ Garzke, p. 179
- ↑ Garzke, p. 190
- ↑ Garzke, p. 180
- ↑ Raven and Roberts, p. 351
- ↑ 126.0 126.1 Chesneau, p. 12
- ↑ Garzke, p. 191
- ↑ 128.0 128.1 Chesneau, pp. 12–13
- ↑ 129.0 129.1 Chesneau, p. 13
- ↑ Rasor, p. 98
- ↑ 131.0 131.1 131.2 Garzke, p. 216
- ↑ Konstam, p. 43
- ↑ 133.0 133.1 Chesneau, p. 14
- ↑ Rohwer, p. 280
- ↑ Garzke, p. 218
- ↑ Operation "Ostfront" - The Battle off the North Cape (25-26. December 1943). http://www.scharnhorst-class.dk/scharnhorst/history/scharnostfront.html.
- ↑ Garzke, p. 219
- ↑ Garzke, p. 220
- ↑ Chesneau, pp. 14–15
- ↑ 140.0 140.1 Rohwer, p. 314
- ↑ Rohwer, p. 350
- ↑ 142.0 142.1 142.2 142.3 Chesneau (2004), p. 15
- ↑ Garzke, p. 221
- ↑ Garzke, p. 222
- ↑ Rohwer, p. 221
- ↑ Rohwer, p. 233
- ↑ Cheneau (2004), p. 16
- ↑ Konstam, p. 44
- ↑ Garzke, p. 224
- ↑ Garzke, p. 225
- ↑ Rohwer, p. 195
- ↑ Rohwer, p.219
- ↑ Rohwer, p. 226
- ↑ Garzke, p. 223
- Bibliography
Books
- Breyer, Siegfried. Battleships of the World 1905–1970. Conway Maritime Press.
- Brown, D K (2006). Nelson to Vanguard: Warship Design and Development 1923–1945. Chatham Publishing.
- Burt, R. A. (2012). British Battleships, 1919–1939 (2nd ed.). Annapolis, Maryland: Naval Institute Press. ISBN 978-1-59114-052-8.
- Campbell, John (1985). Naval Weapons of World War II. Annapolis, Maryland: Naval Institute Press. ISBN 0-87021-459-4.
- Crompton, Samuel Willard (2004). Sinking of the Bismarck. Chelsea House. ISBN 0791074382.
- Garzke, William H., Jr.; Dulin, Robert O., Jr. (1980). British, Soviet, French, and Dutch Battleships of World War II. London: Jane's. ISBN 0-7106-0078-X.
- Kennedy, Ludovic (1974). Pursuit. New York City, NY: The Viking Press. ISBN 0670583146.
- Marriott, Leo (2004). Vital Guide Fighting Ships of World War II. Ramsbury, England: Airlife Crowood Press. ISBN 1-84037-416-0.
- Miller, Nathan (1995). War at Sea. New York City, NY: Scribner. ISBN 978-0684803807.
- Konstam, Angus, ed (2009). British Battleships 1939–45 (1) Queen Elizabeth and Royal Sovereign Classes (New Vanguard). Osprey Publishing. ISBN 1846033888.
- Raven and Roberts. British Battleships of World War Two: The Development and Technical History of the Royal Navy's Battleships and Battlecruisers from 1911 to 1946. Weidenfeld & Nicholson. ISBN 978-0853681410.
- Rohwer, Jürgen (2005). Chronology of the War at Sea 1939–1945: The Naval History of World War Two (Third Revised ed.). Annapolis, Maryland: Naval Institute Press. ISBN 1-59114-119-2.
- Tarrant, V.E. (1991). King George V-class battleships. London: Arms and Armour Press. ISBN 1-85409-026-7.
Further reading[]
- Hein, David. “Vulnerable: HMS Prince of Wales in 1941.” (Abstract) Journal of Military History 77, no. 3 (July 2013): 955-989.
External links[]
| Wikimedia Commons has media related to King George V class battleship (1939). |
- News reel footage of Operation Halberd, as filmed from Prince of Wales
- Newsreel video of HMS Anson and Howe in 1942
- RN 14" gun loading and firing procedure
| |||||||||||
| ||||||||||||||||||||||||||||||||||||||||||||||||||
| |||||||||||
The original article can be found at King George V-class battleship (1939) and the edit history here.
]