| Royal Wiltshire Yeomanry (Prince of Wales's Own) | |
|---|---|
|
Badge and service cap as worn at the outbreak of World War II – the cap badge is simply the Prince of Wales' feathers | |
| Active | 1794–present |
| Country |
|
| Branch |
|
| Type | Yeomanry |
| Role | Armoured reserve |
| Size | Two squadrons |
| Part of | Royal Armoured Corps |
| Garrison/HQ | Salisbury and Swindon |
| Motto(s) | Primus in Armis |
| Colours on the stable belt of the RWY. |
 |
| Engagements | |
| Battle honours | See battle honours below |
Guidon of the RWY
The Royal Wiltshire Yeomanry (RWY) was a Yeomanry regiment of the Kingdom of Great Britain and the United Kingdom established in 1794. It was disbanded as an independent Territorial Army unit in 1967, a time when the strength of the Territorial Army was greatly reduced. The regiment lives on in B (Royal Wiltshire Yeomanry) and Y (Royal Wiltshire Yeomanry) Squadrons of the Royal Wessex Yeomanry.
The regiment took part in the Second Boer War as part of the Imperial Yeomanry. In the First World War, it fought on the Western Front, but saw relatively little action as horsed cavalry. After conversion to infantry, it fought in the trenches, notably during 3rd Ypres in 1917 and during the German Spring Offensive in 1918.
In the Second World War, the regiment fought in the Middle East, seeing action in Syria against Vichy French forces, as well as operations in Iraq and Iran. It then joined 9th Armoured Brigade, seeing action in North Africa and Italy. With this formation, it took part in the Second Battle of El Alamein, spearheading the break-out of the 2nd New Zealand Division during Operation Supercharge on 2 November 1942.
The Royal Wiltshire Yeomanry cap badge is the Prince of Wales's feathers on a red baize backing, and vehicles carry the New Zealand fern leaf emblem.
History
Formation and early history
On 4 June 1794, a meeting of country gentlemen at the Bear Inn in Devizes decided to raise a body of ten independent troops of Yeomanry for the county of Wiltshire. The decision was implemented by the High Sheriff Richard Long.[1] Five gentlemen were identified to be captains in the unit.[2] The existing troops were regimented into the Wiltshire Yeomanry Cavalry in 1797.[3] Neither the Yeomanry, nor the Militia (the infantry counterpart of the Yeomanry), were liable for service overseas and so the regiment took no part in the Napoleonic or later wars of the 19th century. However the Royal Wiltshire Yeomanry was called to deal with civil disorders, such as a mutiny by the county Militia in Devizes, the Swing Riots and the 'machine riots'. In recognition of this service, the Regiment was awarded the title 'Royal' by King William IV in 1831; the first yeomanry regiment to be so honoured.[3] Contrary to common belief, the Regiment was not involved in the restoration of order after the Bristol riots, which followed the rejection of the 1830 Reform Bill (although they did mobilise for the duty before regular troops restored order).[4] In 1863, it provided an escort to the Prince of Wales (later King Edward VII) through the Savernake Forest, in recognition of which it was the first regiment in the British Army to be awarded the title of 'Prince of Wales's Own' (entitling it to wear the Prince of Wales's feathers as a badge).[3] In 1884, it was placed at the head of the newly formed Yeomanry Order of Precedence by Queen Victoria.[5]
Second Boer War
The Yeomanry was not intended to serve overseas, but due to the string of defeats during Black Week in December 1899, the British government realized they were going to need more troops than just the regular army. A Royal Warrant was issued on 24 December 1899 to allow volunteer forces to serve in the Second Boer War. The Royal Warrant asked standing Yeomanry regiments to provide service companies of approximately 115 men each for the Imperial Yeomanry.[6] The regiment provided:[7]
- 1st (Wiltshire) Company, 1st Battalion in 1900
- 2nd (Wiltshire) Company, 1st Battalion in 1900
- 63rd (Wiltshire) Company, 16th Battalion in 1900, transferred to 1st Battalion in 1902
In 1900, the regiment represented the Yeomanry cavalry at the inauguration of the Commonwealth of Australia.[8]
On 17 April 1901, the regiment was renamed as the Royal Wiltshire Imperial Yeomanry (Prince of Wales's Own Royal Regiment) and reorganised in four squadrons and a machine gun section. On 1 April 1908, the regiment was renamed as the Royal Wiltshire Yeomanry (Prince of Wales's Own Royal Regiment) and transferred to the Territorial Force, trained and equipped as hussars. The regiment was based at the Yelde Hall in Chippenham at this time.[9] Its organisation was:[3]
| Royal Wiltshire Yeomanry (Prince of Wales's Own Royal Regiment) | |
|---|---|
| HQ | Chippenham |
| A Squadron | Warminster (detachments at Longbridge Deverill, Whiteparish, Salisbury, Amesbury, Trowbridge) |
| B Squadron | Chirton (detachments at Melksham, Marlborough, Devizes, Lavington, Urchfont) |
| C Squadron | Chippenham (detachments at Corsham, Wootton Bassett, Malmesbury, Calne, Purton, Ashton Keynes) |
| D Squadron | Swindon |
It was ranked 1st (of 55) in the order of precedence of the Yeomanry Regiments in the Army List of 1914.[10]
First World War
| 1st South Western Mounted Brigade
Salisbury |
|---|
|
Organisation on 4 August 1914 |
|
Assigned units
|
|
Training attachments
|
|
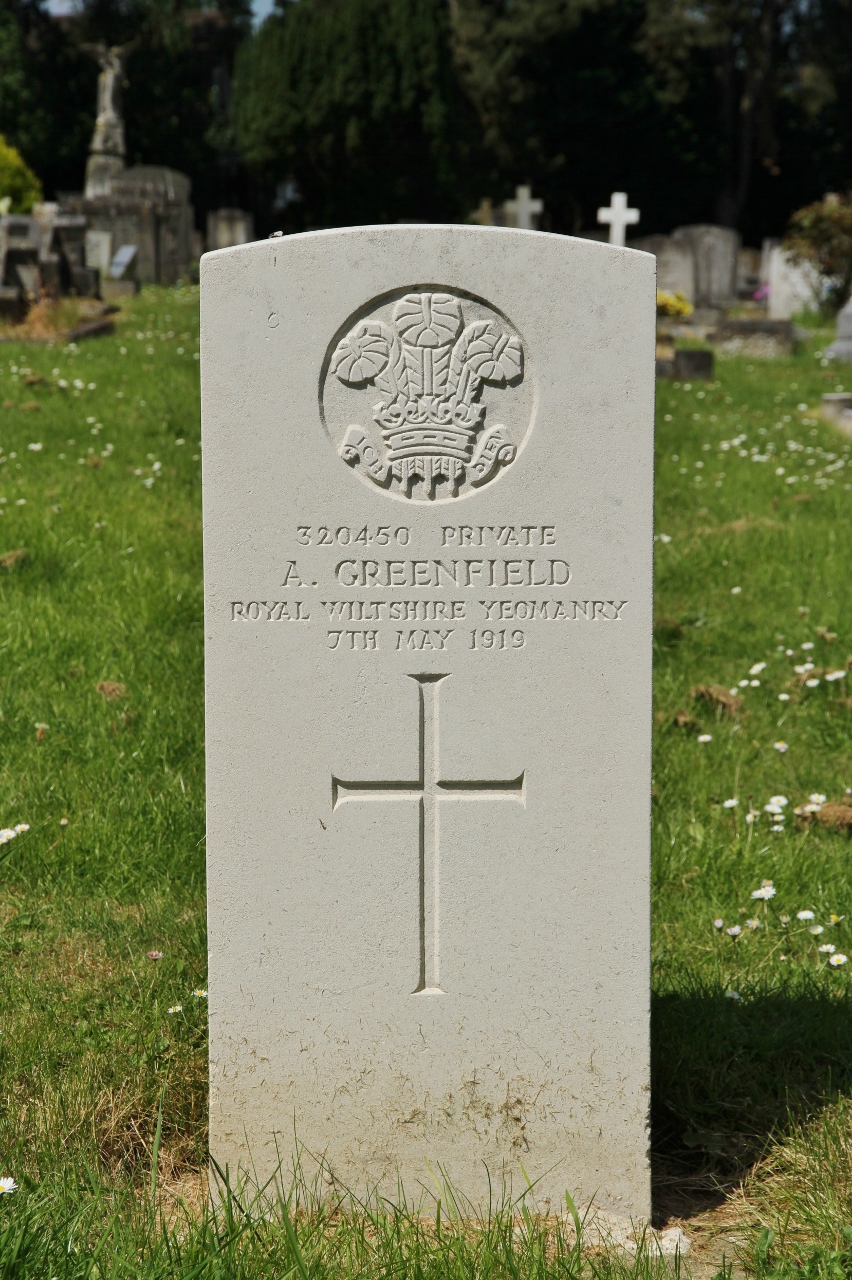

CWGC headstone in Rose Hill Cemetery, Cowley, Oxfordshire of an RWY private who died in 1919 six months after the Armistice
In accordance with the Territorial and Reserve Forces Act 1907 (7 Edw. 7, c.9) which brought the Territorial Force into being, the TF was intended to be a home defence force for service during wartime and members could not be compelled to serve outside the country. However, on the outbreak of war on 4 August 1914, many members volunteered for Imperial Service. Therefore, TF units were split in August and September 1914 into 1st Line (liable for overseas service) and 2nd Line (home service for those unable or unwilling to serve overseas) units. Later, a 3rd Line was formed to act as a reserve, providing trained replacements for the 1st and 2nd Line regiments.[11]
1/1st Royal Wiltshire Yeomanry
The regiment was mobilised in August 1914 in the 1st South Western Mounted Brigade, but did not proceed to France until December 1915. In May 1916, two squadrons joined the XV Corps cavalry unit, with two further squadrons joining IX Corps Cavalry regiment. During 1916–17, duties mainly involved policing, traffic control, despatch riding and similar activities. In March 1917, the regiment played its only part in the War as horsed cavalry, during the German retreat to the Hindenburg Line. Over an eleven-day period, German forces retreated 20–25 miles to prepared positions. The RWY formed part of the advanced guard of the British Army, attempting to keep in touch with the German rearguards, but this was difficult owing to the broken nature of the ground behind the original German lines. Contact was made several times with Uhlans and a lance captured in one of these engagements is still in possession of the regiment.[12]
In September 1917, it was finally conceded that there was little place for horsed cavalry in the Western Front. The regiment was converted to infantry and joined the 6th Battalion, The Wiltshire Regiment (6th Wilts), fighting in the trenches at Ypres and Cambrai in 1917. In March 1918, the German army mounted its Spring Offensive and 6th Wilts at one point took the whole weight of the offensive at Bapaume. After a week of combat, 6th Wilts (half of whom were ex-RWY) had taken over 500 casualties. In April, they received reinforcements but later that month took another 400 casualties on the Messines Ridge. Shortly after this, it was decided to disband 6th Wilts as they had effectively ceased to exist. The regiment won 13 battle honours for the First World War, most earned with 6th Wilts.[13]
2/1st Royal Wiltshire Yeomanry
The 2nd Line regiment was formed in 1914. In May 1915, it was with 2/1st South Western Mounted Brigade in the Calne area and moved in September to Canterbury.[14] On 31 March 1916, the remaining Mounted Brigades were ordered to be numbered in a single sequence;[15] the brigade became the 15th Mounted Brigade and joined 4th Mounted Division at Colchester.[14]
In July 1916, there was a major reorganization of 2nd Line yeomanry units in the United Kingdom. All but 12 regiments were converted to cyclists[15] and as a consequence the regiment was dismounted and joined the 6th Cyclist Brigade (and the division became 2nd Cyclist Division) at Tolleshunt d'Arcy near Tiptree. Further reorganization in November 1916 saw the 2nd Cyclist Division being broken up and the regiment was merged with the 2/1st North Somerset Yeomanry to form 10th (Wiltshire and North Somerset) Yeomanry Cyclist Regiment in 4th Cyclist Brigade at Ipswich. In March 1917 it resumed its identity as 2/1st Royal Wiltshire Yeomanry, still in 4th Cyclist Brigade at Ipswich. In July it was at Wivenhoe and later moved to Frinton and Clacton. Early in 1918, the regiment moved to Ireland with 4th Cyclist Brigade and was stationed in Dublin; there was no further change before the end of the war.[16]
3/1st Royal Wiltshire Yeomanry
The 3rd Line regiment was formed in 1915 that summer it was affiliated to a Reserve Cavalry Regiment at Tidworth. In the summer of 1916, it was affiliated to the 11th Reserve Cavalry Regiment, also at Tidworth. Early in 1917, it was absorbed in the 3rd Reserve Cavalry Regiment at Aldershot. By 1918, it had left the 3rd Reserve Cavalry Regiment as the 1st Line had been converted to infantry. It joined the 4th (Reserve) Battalion of the Wiltshire Regiment at Larkhill.[17]
Between the wars
Post war, a commission was set up to consider the shape of the Territorial Force (Territorial Army or TA from 1 October 1921). The experience of the First World War made it clear that cavalry was surfeit. The commission decided that only the 14 most senior regiments were to be retained as cavalry (though the Lovat Scouts and the Scottish Horse were also to remain mounted as "scouts"). Eight regiments were converted to Armoured Car Companies of the Royal Tank Corps (RTC), one was reduced to a battery in another regiment, one was absorbed into a local infantry battalion, one became a signals regiment and two were disbanded. The remaining 25 regiments were converted to brigades[lower-alpha 1] of the Royal Field Artillery between 1920 and 1922.[20] As the most senior regiment in the order of precedence, the regiment was retained as horsed cavalry.[10]
During the interwar period, it remained an important part of the social scene of the county having its officers drawn from the nobility, landowners, and larger farmers, while other ranks coming largely from their estates. Hunting, point-to-points, and social events seem to have been as important as military training. The chapter of the Regimental History relating to the period 1920–1939 is even entitled "The Long Weekend".[21]
This brought the regiment into contact for the first time with someone it would later meet more seriously, Brigadier Bernard Law Montgomery (often referred to as "Monty"), then commanding the 9th Infantry Brigade in Portsmouth. In 1937, the brigade was on an exercise in Wiltshire and RWY was attached to it for their two-week annual camp. The brigade major wrote that "[The Regiment] was run like so much of the TA those days on rather feudal lines...when they heard they were going to have those tremendous exercises – three nights out at a time – they jibbed violently....Most of them had looked forward to exercises all day and then going out for a bit of jollity at night." The upshot was that the regiment was banished to a distant part of the camp where their socialising would not be disturbed by the Regulars. However, apparently the Yeomanry were so intrigued by Monty's exercises that their Commanding Officer (CO) approached him, asking to be included in the last brigade exercise.[22]
Second World War
The regiment began to mobilise in August 1939, a few days before the Second World War began. Initially, it was assigned as Divisional Cavalry to the 43rd (Wessex) Infantry Division, then to the 4th Cavalry Brigade commanded by Brigadier J. J. Kingstone, as part of the 1st Cavalry Division bound for Palestine. The regiment served there and in Syria, North Africa and Iraq. In North Africa, the unit served as a searchlight regiment in ports such as Tobruk and Benghazi. In January 1941, after 150 years, its horses were finally replaced by motorised transport. In June, it was involved in the successful campaign against Vichy French forces in Syria, in spite of being desperately short of equipment and serviceable machine-guns. In July 1941, the 4th Cavalry Brigade became the 9th Armoured Brigade and participated in the expedition into Persia, with the regiment fighting as motorized infantry. In December, it received its first Honey tanks, finally becoming an armoured regiment.[23]
In May 1942, the regiment moved to Egypt with the brigade, which became an independent brigade placed under the operational control of Lieutenant-General Bernard C. Freyberg's 2nd New Zealand Division, part of the British Eighth Army, then under the command of General Claude Auchinleck, later replaced by Lieutenant-General Bernard Montgomery. The brigade was in reserve during the Battle of Alam el Halfa in late August and in October began training for the Battle of El Alamein.[24]
El Alamein – Lightfoot
The opening of the battle saw four divisions (9th Australian, 51st Highland, 2nd New Zealand and 1st South African) in the assault on the north of the Axis positions. RWY was in support of the 5th New Zealand Brigade (Brigadier Howard Kippenberger); the aim was for infantry to secure the Miteiriya Ridge during darkness, with the armour to pass beyond them at first light to establish a screen. By now, the regiment was equipped with a mix of M4 Sherman, Crusader and Grant (M3 Lee) tanks. On the morning of 24 October 1942, A and C squadrons were ahead of the infantry on the western slopes of the ridge. B squadron had been delayed in the devil's gardens minefields and had lost numerous tanks. Throughout that day, A and C Squadrons engaged German panzers on the plain below, and were in turn hit by anti-tank fire. Initially, the heavier Sherman tanks were not vulnerable to this, but, when the German 88mm anti-tank guns joined in, they took severe casualties. By midday, the two squadrons were reduced to one Sherman and three Grants and the commanding officer had been badly wounded and evacuated. The 10th Armoured Division, under the command of Major-General Alexander H. Gatehouse, was at this stage supposed to pass through and onwards to start the break-out, but seemed to be reluctant to do so.[25]
At 6 p.m. the regiment was ordered to withdraw. It had lost almost all of its tanks and taken 42 casualties killed or wounded. In reserve, the regiment was issued with new tanks, a hasty mix of Shermans, Grants, and Crusaders (types II and III), mostly salvaged from the battlefield and rapidly repaired. Montgomery had been impressed with the performance of the 2nd New Zealand Division and wanted them to spearhead the next thrust, but Freyberg was unwilling to do so without reinforcements, as his troops had suffered so many casualties. Montgomery therefore placed 151 (from 50th Division) and 152 Infantry (from 51st Division) brigades under Freyberg's command for the next phase of the battle.[26]
El Alamein – Supercharge
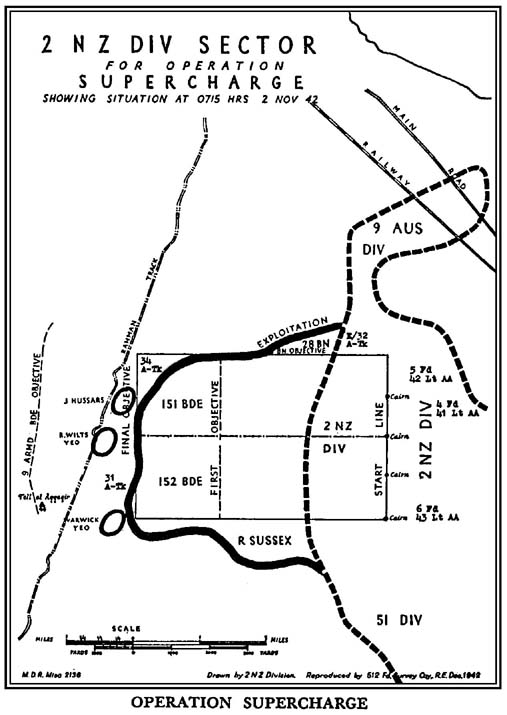

Dispositions at the end of Operation Supercharge[27]
On the night of 1/2 November 1942, the Eighth Army attacked again in the north, with 2nd New Zealand Division in the lead. Freyberg placed 151 Brigade on the right and 152 Brigade on the left. The aim was to attack directly westwards across the Rahman track, with the infantry leading the night assault and 9th Armoured Brigade (now commanded by Brigadier John C. Currie) again passing through to break the enemy gun line and allow X Corps to break out. The assault went to plan except that opposition on the left was heavier than expected which slowed the advance. As a result, the advancing tanks were highlighted against the dawn sky in the east and began to be picked off by Axis anti-tank fire. The Regiment was in the centre of the 9th Armoured Brigade, and the CO lost touch with both his artillery support and close anti-tank support. In the growing light, the B squadron commander (Major M.StJ.V.Gibbs) realised that he was in a ring of enemy anti-tank guns, ahead and to both flanks. He gave the order to 'Charge' and B Squadron overran the anti-tank positions, losing some vehicles but destroying the enemy gun line.[28] Meanwhile, the 21st Panzer Division was counter-attacking A and C Squadrons and at 4pm the Regiment (now down to four tanks) was withdrawn. The 1st Armoured Division from X Corps were just behind the 9th Armoured Brigade but there were no liaison officers between the units and 1st Armoured did not take the opportunity to push on through the broken Axis gun-line.[29]
After the 9th Armoured Brigade's action, Brigadier Gentry of the 6th New Zealand Brigade went ahead to survey the scene. On seeing Brigadier Currie asleep on a stretcher, he approached him saying, 'Sorry to wake you John, but I'd like to know where your tanks are?' Currie waved his hand at a group of tanks around him, replying 'There they are.' Gentry was puzzled. 'I don't mean your headquarters tanks, I mean your armoured regiments. Where are they?' Currie waved his arm and again replied, 'There are my armoured regiments, Bill.'[30]
Nevertheless, the assault of the 2nd New Zealand Division had drawn in both 15 and 21 Panzer Divisions, with the result that there was a wide gap in the Axis lines to the south west. Through this gap Montgomery pushed the remainder of his armour, breaking the Afrika Korps line and pushing westwards into its rear areas and supply lines. By 4 November, the battle was won and Montgomery was entertaining the captured Afrika Korps commander, von Thoma, to dinner in his caravan.[31]
In an account of the battle published to mark its 25th anniversary, Montgomery wrote:
I must mention the magnificent fight put up by 9th Armoured Brigade — 3rd Hussars, Wiltshire Yeomanry, Warwickshire Yeomanry.... If the British armour owed any debt to the infantry of 8th army, the debt was paid on November 2nd by 9th Armoured Brigade in heroism and blood....[32]
Syria and Italy


CO's command tank, Syria, 1943. The flag above his head bears the Prince of Wales feathers. Tanks bore names of Wiltshire towns, villages and pubs to aid identification and boost morale[33][34]
Following El Alamein, the 9th Armoured Brigade was withdrawn first to Cairo and then to Syria for internal security duties, where it remained throughout 1942 and 1943. In May 1944, it reached the Italian Front and was placed under the command of Major-General Charles F. Keightley's 78th "Battleaxe" Division, then under Lieutenant-General Sidney C. Kirkman's XIII Corps. The RWY was to support the 36th Infantry Brigade, with one squadron in support of each of the brigade's three infantry battalions. In May–June 1944, it took part in the advance on Rome, working its way up in close country between the central mountains and the sea to the west. At one point, the 78th Division withdrew, but outlying elements of the regiment did not get the message and continued forwards. The Corps HQ diary for 23 June records 'RWY water truck reports Vaiano clear of enemy'.[35]
In July and August, the 9th Armoured Brigade worked in support of the 4th and 10th Indian Infantry Divisions in the central mountains south east of Florence, on the approach to the Gothic Line. In August, the order was received that all men with over 4½ years service overseas should be repatriated, and this reduced the regiment's strength by half. This made it impossible to function as a fighting unit and it was withdrawn from the line of battle. In October 1944, the regiment returned to England to train replacements for armoured regiments still fighting in Europe. It continued in this role until 1946, although the pace slowed after victory in Europe in May 1945.[36]
During the Second World War, officers and soldiers serving with the regiment received three Distinguished Service Orders, four Military Crosses and ten Military Medals. The regiment lost 59 dead during the war, with the biggest single loss being 20 dead on or around 2 November 1941 during Operation Supercharge.[37]
Post war
In 1947, the regiment again ceased to exist, but the following year was re-established as a heavy tank unit in support of 43rd (Wessex) Infantry Division, equipped with Cromwell and Charioteer tanks.[38]
In 1958, the regiment converted to a light reconnaissance role equipped with armoured cars, such as the Daimler, Humber, Saladin and Ferret. By 1964, there were just three armoured regiments in the Territorial Army and, in 1967, it was decided to reduce the TA even further and the regiment was disbanded as an independent unit. However, a new TA unit, the Royal Yeomanry, was formed from five different predecessor units and the Royal Wiltshire Yeomanry was reborn as A Squadron, The Royal Yeomanry.[38]
During the Cold War, its role in the event of war would have been as a medium reconnaissance unit for the British Army of the Rhine (BAOR). In 1971, a second Royal Wiltshire Yeomanry-based squadron was raised, as B squadron, Royal Wessex Yeomanry.[38] This was initially a home defence unit trained as infantry, but later equipped with stripped down Land Rovers to perform reconnaissance duties.[39]
A (Royal Wiltshire Yeomanry) Squadron changed command and name from the Royal Yeomanry on 1 July 2014 to become Y (Royal Wiltshire Yeomanry) Squadron, Royal Wessex Yeomanry[40] and, like B (Royal Wiltshire Yeomanry) Squadron, Royal Wessex Yeomanry, started to train on Challenger 2 tanks.[41]
The Royal Wessex Yeomanry now operates as the Armoured Reserve Regiment providing formed crews for three Regular Army regiments operating the Challenger 2 main battle tank.[42]
Battle honours
The Royal Wiltshire Yeomanry was awarded the following battle honours (honours in bold are emblazoned on the regimental colours):[3]
| Second Boer War | South Africa 1900–01 |
| First World War | Ypres 1917, Broodseinde, Passchendaele, Somme 1918, St. Quentin, Bapaume 1918, Lys, Messines 1918, Bailleul, Kemmel, France and Flanders 1916–18 |
| Second World War | Iraq 1941, Palmyra, Syria 1941, El Alamein, North Africa 1942, Liri Valley, Advance to Tiber, Citta della Pieve, Trasimene Line, Advance to Florence, Monte Cedrone, Citta di Castello, Italy 1944 |
The regiment's battle honours are summarised and illustrated in the picture of the RWY guidon which forms the frontispiece of the regimental history.[43]
Uniforms and insignia
The New Zealand fern leaf still worn on RWY vehicles.
During the 19th century, the regiment, in common with other Yeomanry and Militia units, sported a range of uniforms. Jackets were always dark blue. Between 1812 and 1873, a leather shako was worn, replaced in 1873 by a fur Busby with a red cloth bag. Service dress during the First World War was a khaki tunic and breeches, with a red stripe down the seam and a red lanyard worn by all ranks round the left armpit. The chevrons of sergeants and corporals were surmounted by a regimental badge on a red baize backing, a practice that continued through the inter-war years and beyond.[44]
The regimental colours of green, red and yellow, which appear on the regimental tie and Stable belt, were decided on in the late 19th century. One officer (who was also a Conservative MP) suggested green with a red stripe, but this was objected to because it was similar to the Rifle Brigade. Another officer (a Liberal MP) suggested adding yellow, which was agreed. The joke was that red and yellow were Liberal colours, and the Liberal MP got away with this under his rival's nose.[45]
The cap badge of the RWY is the Prince of Wales's feathers is a slightly different design to other regiments wearing the same symbol, such as the Royal Regiment of Wales. It is worn on the brown beret with a red baize and a black baize backing. During the First World War, men from the RWY carved their cap badge into the chalk hillside above the village of Fovant where it can still be seen today, alongside those of other units.[46]
The New Zealand 'fern leaf' emblem was painted on the regiment's vehicles when it was under the command of 2nd New Zealand Division, a tradition which continues to this day.[47] The brigade sign, worn during the Italian campaign but not subsequently, was a white horse on a green square background.[48]
See also
| Wikimedia Commons has media related to Category:Royal Wiltshire Yeomanry. |
- Imperial Yeomanry
- List of Yeomanry Regiments 1908
- Yeomanry
- Yeomanry order of precedence
- British yeomanry during the First World War
- Second line yeomanry regiments of the British Army
Notes
- ↑ The basic organic unit of the Royal Artillery was, and is, the Battery.[18] When grouped together they formed brigades, in the same way that infantry battalions or cavalry regiments were grouped together in brigades. At the outbreak of the First World War, a field artillery brigade of headquarters (4 officers, 37 other ranks), three batteries (5 and 193 each), and a brigade ammunition column (4 and 154)[19] had a total strength just under 800 so was broadly comparable to an infantry battalion (just over 1,000) or a cavalry regiment (about 550). Like an infantry battalion, an artillery brigade was usually commanded by a lieutenant colonel. Artillery brigades were redesignated as regiments in 1938.
References
- ↑ Mosley, Charles (2003). Burke's Peerage, Baronetage & Knightage, 107th edition. 2. Wilmington, Delaware, U.S.A.: Burke's Peerage (Genealogical Books) Ltd. p. 2388.
- ↑ "No. 13681". 5 July 1794. p. 685. https://www.thegazette.co.uk/London/issue/13681/page/685
- ↑ 3.0 3.1 3.2 3.3 3.4 "Archived copy". Archived from the original on 23 October 2007. https://web.archive.org/web/20071023103920/http://www.regiments.org/regiments/uk/volmil-england/vcav/wilts.htm. Retrieved 8 March 2013.
- ↑ Order was restored by the 14th King's Hussars; see Cannon, Richard (1847). Historical record of the Fourteenth or the King's Regiment of Light Dragoons containing an account of the formation of the regiment and of its subsequent services. Parker, Furnivall and Parker. p. 57. https://babel.hathitrust.org/cgi/pt?id=aeu.ark:/13960/t5q823m7w;view=1up;seq=6.
- ↑ Official Programme for - "Royal Review of Serving Regiments & Yeomanry Old Comrades by HER MAJESTY THE QUEEN" Yeomanry Titles in order of Parade, 1994.
- ↑ Mileham 1994, p. 27
- ↑ "Archived copy". Archived from the original on 29 May 2007. https://web.archive.org/web/20070529010837/http://www.regiments.org/regiments/uk/cav/ImpYeo.htm. Retrieved 29 May 2007.
- ↑ Platt 1972, pp. 15–17
- ↑ "Chippenham". The Drill Hall Project. http://www.drillhalls.org/Counties/Wiltshire/TownChippenham.htm. Retrieved 16 December 2017.
- ↑ 10.0 10.1 Mileham 1994, p. 73
- ↑ Rinaldi 2008, p. 35
- ↑ The Royal Wiltshire Yeomanry Collection
- ↑ Pitt 1946
- ↑ 14.0 14.1 James 1978, p. 30
- ↑ 15.0 15.1 James 1978, p. 36
- ↑ James 1978, pp. 30–31
- ↑ James 1978, p. 31
- ↑ "The Royal Artillery". Ministry of Defence (United Kingdom). http://www.army.mod.uk/artillery/23445.aspx. Retrieved 18 November 2013.
- ↑ Baker, Chris. "What was an artillery brigade?". The Long, Long Trail. http://www.1914-1918.net/whatartbrig.htm. Retrieved 18 November 2013.
- ↑ Mileham 1994, pp. 48–51
- ↑ Platt 1972, pp. 53–71
- ↑ Hamilton 1981, pp. 265–268
- ↑ Platt 1972, pp. 74–114
- ↑ Hammond 2012, p. Appendix
- ↑ Hamilton 1981, p. 781
- ↑ Platt 1972, p. 138
- ↑ Murphy 1966, p. 404
- ↑ Platt 1972, p. 143
- ↑ Hamilton 1981, p. 839
- ↑ Lucas-Phillips 1962, p. 358
- ↑ Hamilton 1981, p. 147
- ↑ The Times, 11 May 1967.
- ↑ Platt 1972, p. 159
- ↑ Ashley, T. "Reference images for Sherman Mark III". Perth Military Modelling. http://www.perthmilitarymodelling.com/reviews/vehicles/dragon/dr6313ref01.htm. Retrieved 12 April 2007.
- ↑ Platt 1972, p. 170
- ↑ Platt 1972, pp. 174–188
- ↑ Platt 1972, p. 252
- ↑ 38.0 38.1 38.2 "Wiltshire Yeomanry". British Army units 1945 on. http://british-army-units1945on.co.uk/territorial-army-yeomanry-rtr/wiltshire-yeomanry.html. Retrieved 15 October 2017.
- ↑ Platt 1972, pp. 189–223
- ↑ "The Royal Wessex Yeomanry dons a new cap badge for a bigger role". Wessex Reserve Forces and Cadets Association. http://www.wessex-rfca.org.uk/royal-wessex-yeomanry-dons-new-cap-badge-bigger-role/. Retrieved 22 October 2017.
- ↑ "The Royal Wessex Yeomanry". Ministry of Defence. http://www.army.mod.uk/armoured/regiments/34829.aspx. Retrieved 15 October 2017.
- ↑ "The Royal Wessex Yeomanry". Ministry of Defence. http://www.army.mod.uk/armoured/regiments/30061.aspx. Retrieved 8 March 2013.
- ↑ Platt 1972, frontispiece
- ↑ Stevens 1940, pp. 339–345
- ↑ Platt 1972, pp. 269–270
- ↑ "Picture Page". Fovant Badges Society. http://www.fovantbadges.com/pictures.htm. Retrieved 12 April 2007.
- ↑ "B (Royal Wiltshire Yeomanry) Squadron". Ministry of Defence. http://www.army.mod.uk/armoured/regiments/30047.aspx. Retrieved 8 March 2013.
- ↑ "British, Commonwealth and Polish tank formations in Italy 1944 and their Markings". Battlefront Miniatures. http://www.flamesofwar.com/hobby.aspx?art_id=325. Retrieved 8 March 2013.
Bibliography
- Hamilton, Nigel (1981). Monty: The Making of a General 1887–1942. London: Book Club Associates. ISBN 0-24110-583-8.
- Hammond, Bryn (2012). El Alamein: The Battle that Turned the Tide of the Second World War. London: Osprey. ISBN 978-1849086400.
- James, Brigadier E.A. (1978). British Regiments 1914–18. London: Samson Books Limited. ISBN 0-906304-03-2.
- Lucas-Phillips, C.E. (1962). Alamein. London: Heinemann.
- Mileham, Patrick (1994). The Yeomanry Regiments; 200 Years of Tradition. Edinburgh: Canongate Academic. ISBN 1-898410-36-4.
- Murphy, W.E. (1966). 2nd New Zealand Divisional Artillery. Wellington, NZ: Historical Publications Branch.
- Pitt, P.W. (1946). Royal Wilts. London: Burrop, Mathieson.
- Platt, J.R.I. (1972). The Royal Wiltshire Yeomanry 1907–1967. London: Garnstone Press. ISBN 0-85511-200-X.
- Rinaldi, Richard A (2008). Order of Battle of the British Army 1914. Ravi Rikhye. ISBN 978-0-97760728-0. https://books.google.com/books?id=hzUZ-26KYQ4C&printsec=frontcover&dq=isbn:9780977607280&hl=en&sa=X&ei=pMfwVODfPJPlaqevgsgB&ved=0CCEQ6AEwAA#v=onepage&q&f=false.
- Stevens, F. (1940). Yeomanry Light Cavalry Uniforms in Wiltshire. Wiltshire Archaeological and Natural History Magazine. xlix.
External links
- Baker, Chris. "The Royal Wiltshire Yeomanry". The Long, Long Trail. http://www.1914-1918.net/rwilts.htm. Retrieved 6 April 2015.
- "Archived copy". Archived from the original on 15 July 2007. https://web.archive.org/web/20070715140005/http://www.regiments.org/regiments/uk/volmil-england/vcav/wilts.htm. Retrieved 8 March 2013.
- Official Royal Wessex Yeomanry Facebook Page
- Official Royal Wessex Yeomanry Regimental website
- Official Royal Yeomanry Regimental website
The original article can be found at Royal Wiltshire Yeomanry and the edit history here.